A beginner's intro to the Linux terminal: read the prompt, move with pwd/ls/cd, get help from man and --help, speed up with Tab and history, meet bash and PATH.
In the second part we installed RHEL; at the end of the install the desktop opened and we briefly opened the terminal from the dock and typed a couple of commands. Today we go back to that window, but this time not as a guest. The rest of the series happens here: files, users, packages, services, the network… we’ll manage all of it from this black-and-white window. So you need to feel at home here first.
Don’t worry, the terminal is not as scary as it looks. In the Algorithms series we brewed tea step by step on paper; the terminal works exactly like that: you type a command, press Enter, it runs, shows the result, and hands the turn back to you. In order, patient, dumb but fast. Let’s get acquainted.
The three words always come up together and confuse people at first. Picture yourself at a bank counter:
The terminal is the counter window you stand at; the box you type the command into and read the answer from. On RHEL 10 this window is called Ptyxis; on other systems it might be GNOME Terminal, Konsole, iTerm. They all do the same job.
The shell is the clerk behind the counter; the program that understands your command, passes it to the operating system and hands the answer back. RHEL’s clerk is called bash.
The prompt is the clerk saying “go ahead, type”. That line to the left of the blinking cursor.
So the terminal is the vessel, the shell is the mind inside it, the prompt is the “I’m listening” sign. From now on, when I say “open the terminal” I mean all three at once.
When you open the terminal a line like this greets you. It looks cryptic but every piece says something:
The prompt is the line mehmet@rhel-lab:~$. whoami tells the user, hostname the machine name, pwd the directory you're in.
Let’s read mehmet@rhel-lab:~$ from left to right:
mehmet is the name of the logged-in user. The whoami command says exactly this.
@ means “at”; a small separator in between.
rhel-lab is the machine’s name, the hostname you set in Part 2. The hostname command confirms it.
: what follows the separator shows where you are.
~ is the directory you’re currently in. This ~ is shorthand for your home directory; your home is /home/mehmet. The pwd command (print working directory) shows the full path plainly.
$ is where the prompt ends and you start typing. This sign says you’re a normal user.
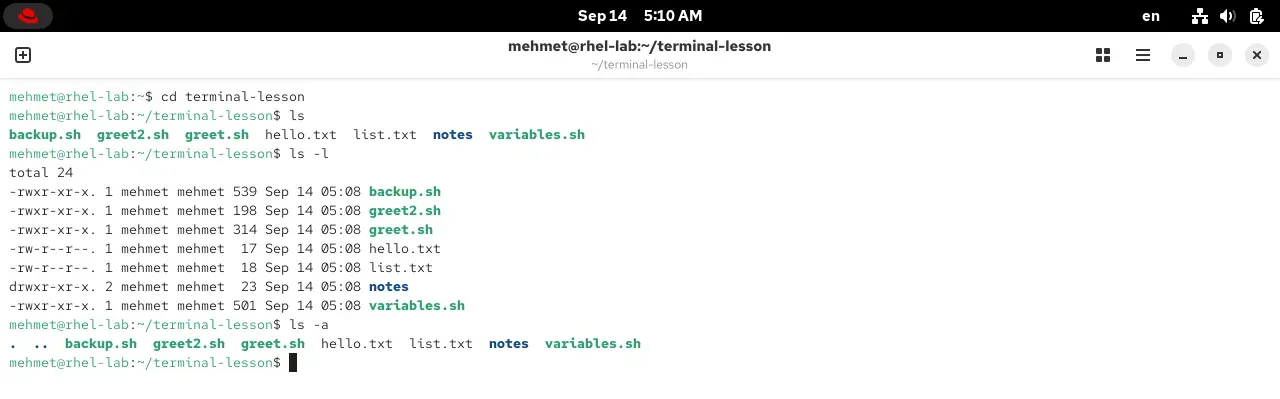
When you move to a new place the first three questions are: where is this, what’s in it, how do I get around. In the terminal those three questions have three commands: pwd, ls, cd.
ls (list) shows the files and folders in the directory you’re in. On its own it gives a plain list; the letters you add make it more talkative.
ls gives a plain list. ls -l is detailed: permissions, owner, size, date. ls -a shows hidden files too (the ones starting with a dot, . and ..).
You see all three forms on the screen:
ls the bare list: backup.sh greet2.sh greet.sh hello.txt list.txt notes variables.sh. Colored ones (folders in blue) give away the type.
ls -l the “long” form. Each line is a file’s ID card: -rw-r--r--. 1 mehmet mehmet 17 Sep 14 05:08 hello.txt. Left to right: type and permissions, link count, owner, group, size (bytes), last-modified date and name. What the permissions mean we’ll discuss at length in Part 6; for now “every file has an owner and permissions” is enough.
ls -a means “all”: it also shows hidden files whose names start with a dot. The leading . stands for the directory you’re in, .. for the directory above; we’ll use these with cd in a moment.
You can combine -l and -a into ls -la; it does both. These little letters are called options; we’ll look at their structure shortly.
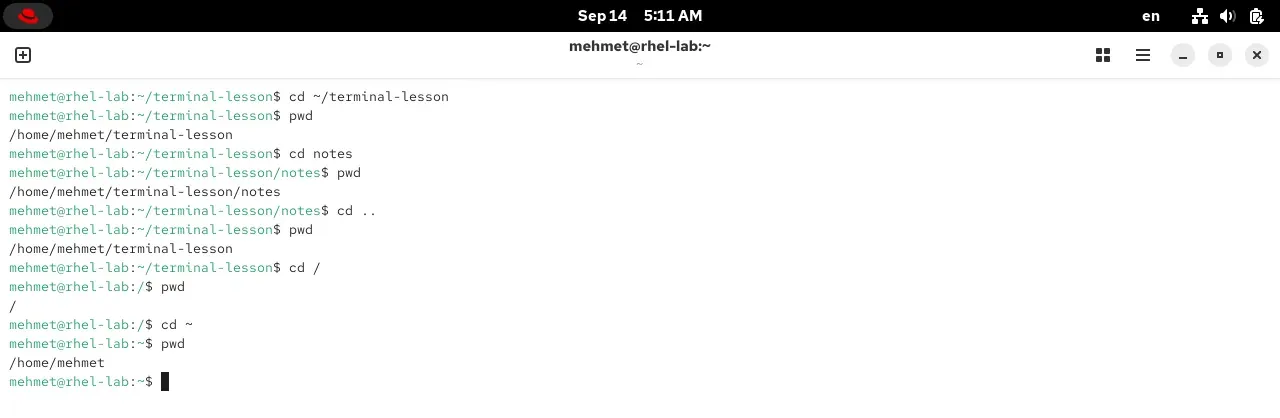
cd (change directory) moves you from one place to another. pwd lets you check “where am I now” at every step. Used together, walking the directory tree becomes easy.
Note: the path in the prompt changes after each cd. We moved with relative paths (notes, ..) and absolute paths (/, ~); pwd reports the exact place at each step.
Let’s follow the journey on the screen; notice that the prompt itself changes:
cd ~/terminal-lesson took us into our lesson folder; the prompt became ~/terminal-lesson.
cd notes went into a subfolder. notes is a relative path: “the notes inside where I am”.
cd .. went up one directory. .. always means “one up”.
cd / took us to the root directory;/ is the top of the whole tree, “everything under /” from Part 1.
cd ~ sent us home: /home/mehmet. cd on its own does the same.
Everything we’ve typed so far fit the same mold. A command line is made of three parts:
The anatomy of a command
ls -l /etc
│ │ │
│ │ └─ argument: the thing the command works on (which directory?)
│ └────── option: an adjustment to the behavior (-l = long form)
└─────────── command: the program to run (ls)
The command says what to do: ls, cd, pwd.
The option (flag) adjusts how. It has two spellings: short (-l, -a) and long (--all, --help). You can combine the short ones: ls -la = ls -l -a.
The argument says what to work on: ls /etc means “list the etc directory”. Without an argument a command usually assumes the directory you’re in.
Once this mold clicks, you can read commands you’ve never seen. command -options arguments; that’s all. In the Java post we were in the same mold when we wrote javac Merhaba.java: command javac, argument Merhaba.java.
Nobody knows every command by heart; even an experienced sysadmin looks up help dozens of times a day. There are two ways, and both work on every machine, without internet.
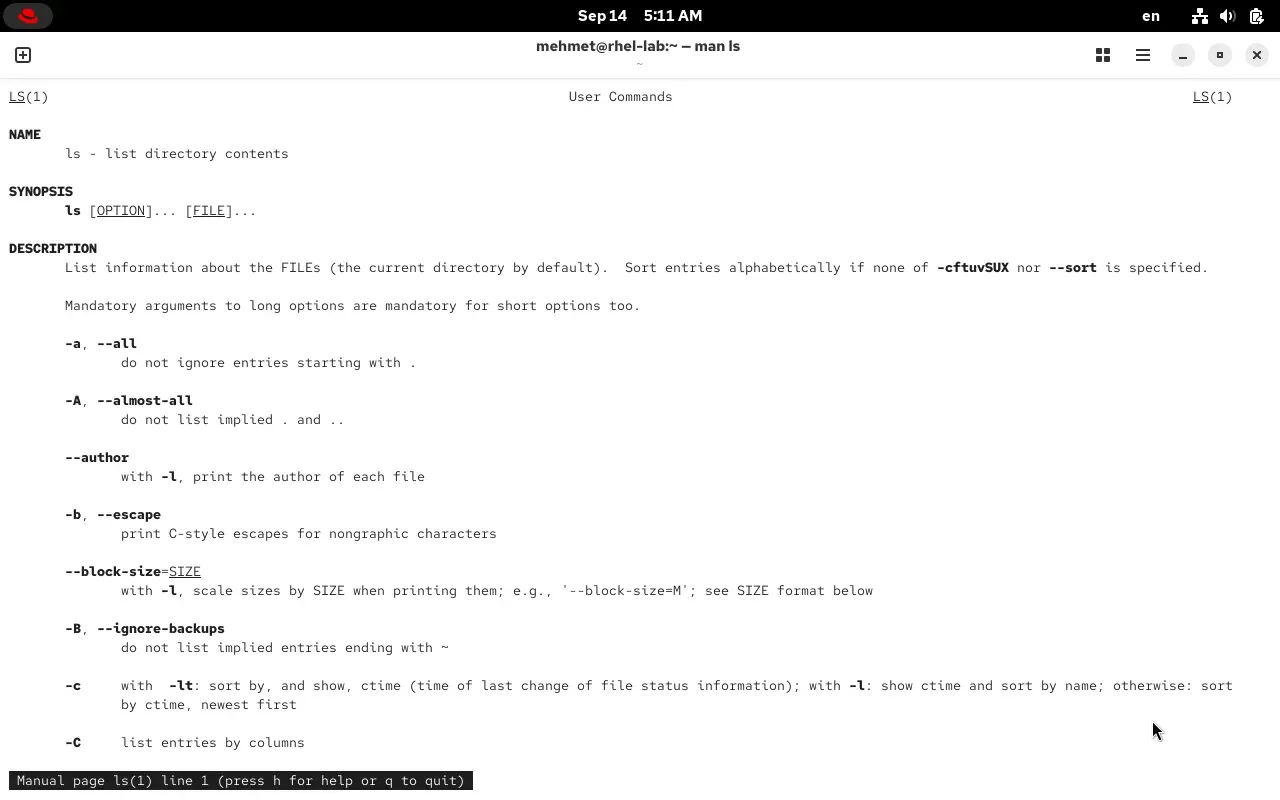
man (manual) opens a command’s full manual. Type man ls and see:
man ls: the official manual for ls. NAME, SYNOPSIS, DESCRIPTION sections and a description of every option. At the bottom it says 'press h for help or q to quit'.
The manual fills the screen and opens inside a pager. Navigating it is easy:
Space or the arrow keys scroll up and down.
/word then Enter searches for that word (n for the next match).
q quits. (The answer for everyone who panics because they can’t get out of the manual: q.)
h gives help.
The LS(1) at the top of the manual has a 1 that’s a section number: 1 = user commands. It matters when the same name is both a command and a config file, but don’t worry about it now.
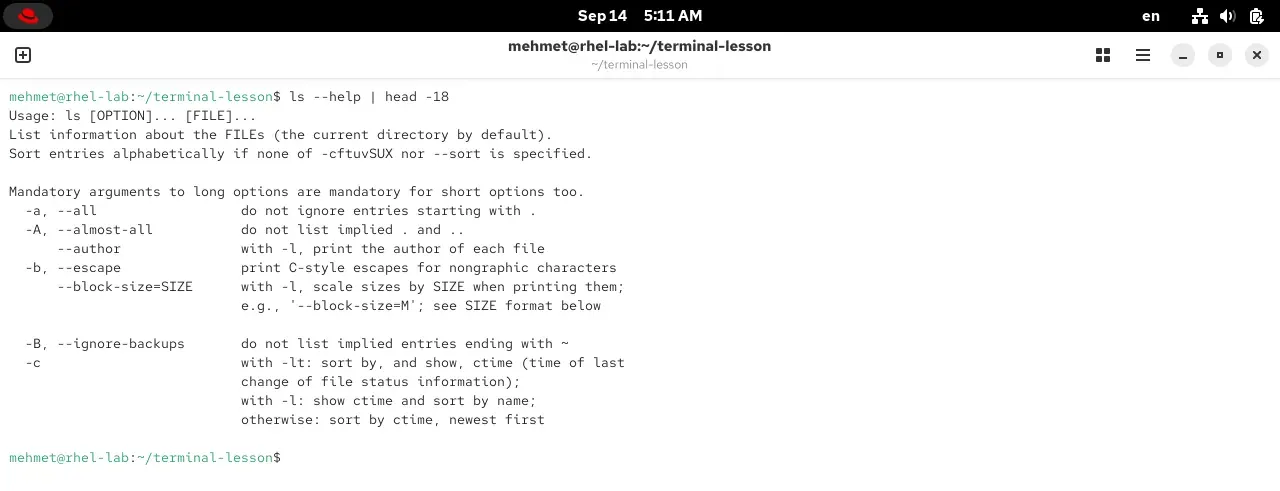
The whole manual is sometimes too much; if you just want to check “which option was it”, --help is faster. It prints a short summary of the command’s options:
ls --help: the usage form and a summary of the options. The output is long, so I cut the top with head -18; it's a pocket-sized version of man.
Type the start of a command or file name and press Tab; the shell completes the rest.
I typed cd ~/ter and pressed Tab; the shell completed the rest as ~/terminal-lesson/. Never type long names by hand, let Tab do it.
If there’s a single possibility it completes at once. If there are several (say Do matches both Documents and Downloads), pressing Tab twice lists them all; you add a few more letters and press Tab again. Tab saves time and heads off most of the “no such file” errors that come from typos. It’s the first habit a beginner should build.
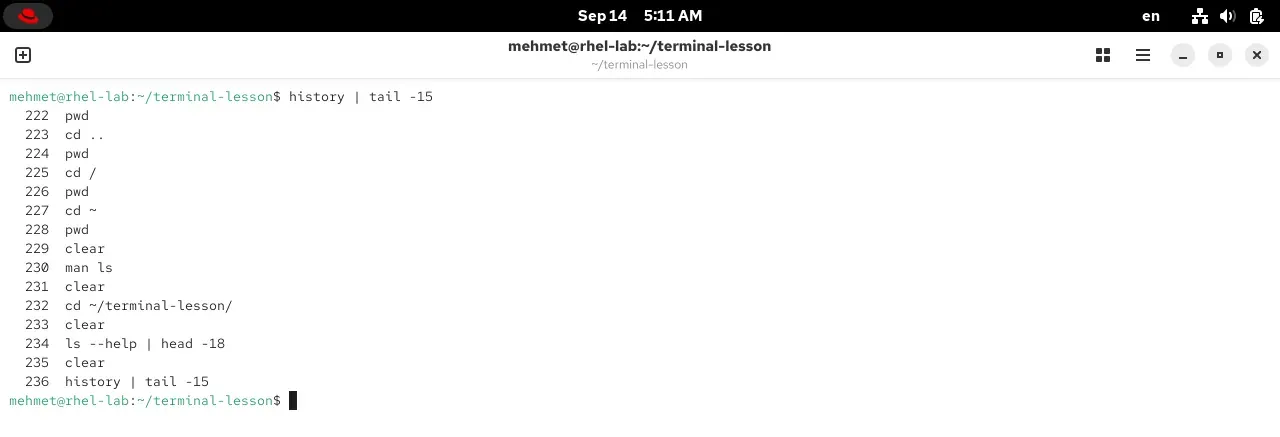
The shell remembers every command you type. The Up arrow brings back previous commands; press Enter and it runs again. To see the whole history, history:
history keeps every command I typed, numbered. The Up arrow brings back the last command; Ctrl+R searches through the history.
Up/Down arrow: move through previous commands.
history: the full numbered list. Type !149 to run command number 149 again.
Ctrl+R: search the history. Start typing a word and the shell finds the last command containing it.
!!: runs the very last command again (especially sudo !!, “run that last command again, as administrator”).
We’ve learned to move around and to get help. Let’s pocket a few small commands too; all harmless, all often useful.
echo prints text to the screen, date gives the date and time, uname -r reports the kernel version: 6.12.0-211.51.1.el10_2, the number we read in Part 2.
echo prints the text you give it: echo Hello, terminal. It looks simple, but it’ll be a backbone when we write variables and scripts in later parts. It’s the terminal’s version of the PRINT command from the Pseudocode post.
date prints the current date and time: Sun Sep 13 10:03:00 PM +03 2026. The +03 at the end is our time zone; we saw this offset in Part 2 while discussing the clock.
uname -r reports the running kernel’s version: 6.12.0-211.51.1.el10_2.x86_64. We took this number apart in Part 2; here’s RHEL 10’s 6.12 kernel, with your own eyes.
cat file dumps a text file’s contents to the screen (for small files); for big ones less file shows it page by page (like man, quit with q).
Let’s stop for a second. In Part 2 we said that if you pick the “Server” or “Minimal” install, no desktop appears, only this black screen. That’s not a limitation. Graphical interfaces (mouse, windows, icons) came later in the history of computing; in the 1970s and 80s every computer was run exactly like this, with text. So the terminal isn’t a stripped-down version of the graphical interface; on the contrary, the graphical interface is a layer added on top of the terminal years afterward. The overwhelming majority of the world’s servers still run today with no desktop, just this screen.
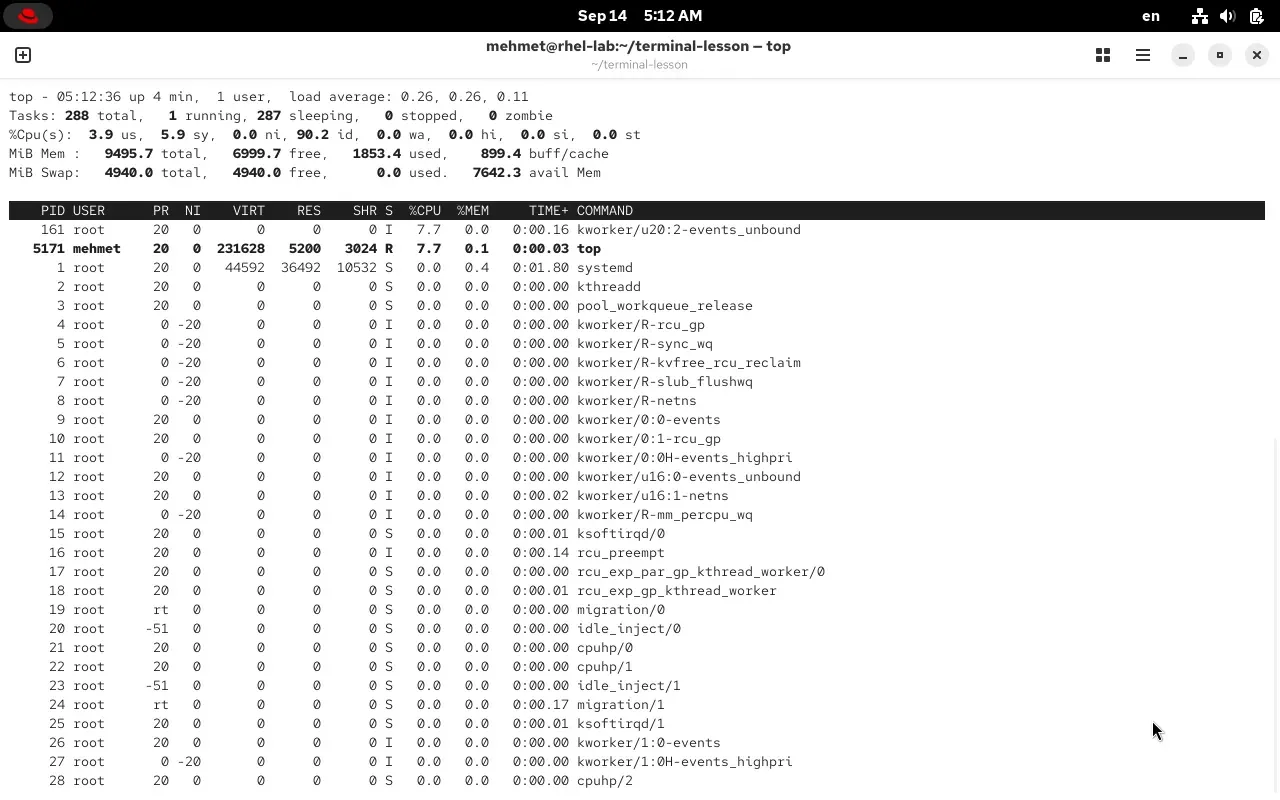
And this black screen does far more than you’d think. There are full-screen programs that use menus, panels, colors, even the mouse, just like graphical programs; they’re called TUIs (Text User Interface). Here’s a program running inside the terminal, drawing a full screen: top, a live monitor of the system’s processes.
top isn't a 'command and output'; it's a full-screen interface with a header, columns and colors, updating live, all drawn from text. You quit with q.
As you can see, this isn’t the familiar “type a command, see output”; it’s an interface with a header and columns, updating live, all drawn from text. And top is not the only one; there’s a whole world of applications inside the terminal:
Text editors:vim, nano, emacs, and the modern helix (written in Rust). You write code and config files alike, all in the terminal.
System monitors:top, htop, and the Rust-written bottom (btm), btop.
File managers: the classic mc (Midnight Commander), the Rust-written yazi.
Modern takes on everyday tools (mostly in Rust):bat (a colorful cat), eza (a modern ls), ripgrep (very fast search), fd (an easy find), zoxide (a smart cd), starship (a slick prompt), atuin (advanced history).
Whole applications:tmux (a window manager that splits the screen, we installed it in Part 2), lazygit and gitui (a Git interface), email clients, music players, even games.
That so many of these tools have been rewritten in Rust in recent years is no accident, it’s a sign of a revival: the black screen didn’t die, on the contrary it’s coming back to life with fast, safe, beautiful tools. Most of them are built on a Rust library called ratatui. So don’t think of the terminal as old technology; today even the newest tools are born here, on this black screen.
When you type ls and press Enter, the shell actually does a few steps of work. Understand this once and errors like “command not found”, and the logic of the terminal, fall into place.
flowchart TD
    A["You typed a line and pressed Enter"] --> B{"Is it a shell<br/>command (builtin)?"}
    B -->|"Yes: cd, pwd"| C["The shell runs it itself"]
    B -->|"No"| D{"Is it an alias?"}
    D -->|"Yes: ls"| E["Substitutes the alias<br/>(ls --color=auto)"]
    D -->|"No"| F["Searches the folders<br/>in the PATH list"]
    E --> F
    F --> G{"Found?"}
    G -->|"Yes"| H["Runs the program,<br/>shows the output"]
    G -->|"No"| I["command not found"]
    H --> J["The prompt returns"]
    I --> J
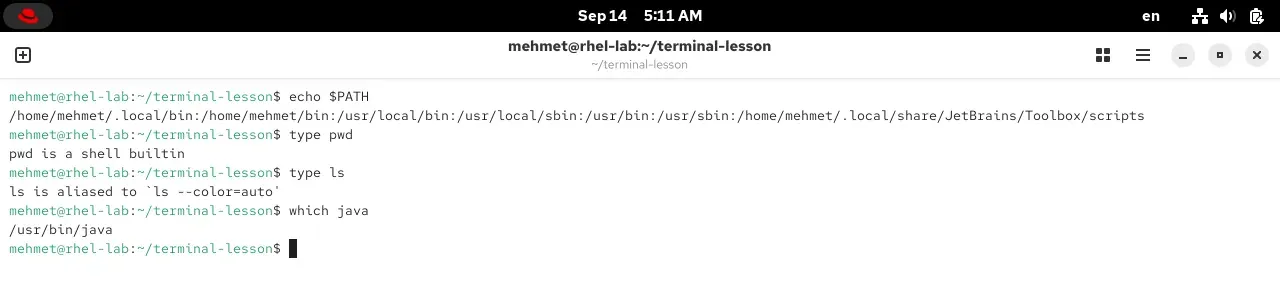
The most critical stop in this chain is PATH. When you type a command, the shell doesn’t search everywhere; it looks in order through a colon-separated list of folders called PATH. Here’s the list on my own machine, and type, which tells you what a name really is:
echo $PATH shows the list of folders where commands are searched. type pwd says 'shell builtin', type ls turns out to be an alias, and which java gives the path /usr/bin/java.
Let’s read the output:
echo $PATH prints that list: /home/mehmet/.local/bin:/home/mehmet/bin:/usr/local/bin:/usr/local/sbin:/usr/bin:/usr/sbin:.... When the shell looks for ls, it checks these folders in order and finds /usr/bin/ls. This is exactly the PATH we saw in the Java JDK installation post; there the JDK folder was added to this list so that javac could be found. Today we see it from the terminal’s point of view.
type pwd → pwd is a shell builtin: pwd isn’t a program on disk, it’s built right into the shell. So is cd; it has to be, because the shell itself keeps track of your current directory.
type ls → ls is aliased to 'ls --color=auto': ls is an alias. RHEL bound it to a shortcut so the output is colorized. That’s why the folders showed up in blue.
which java → /usr/bin/java: which tells you which folder in PATH a command lives in. We installed Java in the Java series; here’s the proof, it really is there.
So not everything you type in the terminal is the same kind of thing: some come from inside the shell (builtin), some from a shortcut (alias), some from a real program on disk (PATH). Telling these three apart solves, up front, a lot of confusing situations later on.
PATH is so central that it’s worth one more step; most “command not found” errors, and most of the tools you’ll install later, look here.
Order matters. The shell scans the list left to right and runs the first match. If two programs share a name, the one earlier in PATH wins. In the Java post this was the cause of “I installed it but it still shows the old version”: the old one came earlier in the list.
Adding a folder. If you put your own programs in ~/.local/bin you don’t have to do anything; RHEL already adds that folder to PATH (we’ll see it in .bashrc shortly). To add another folder: export PATH="$HOME/tools:$PATH". Put it at the front for priority, or at the end ($PATH:...) so you don’t override the system’s commands.
Temporary or permanent?export PATH=... applies only to that terminal; it’s gone when you close the window. To make it permanent you write it into a startup file (~/.bashrc); that’s exactly the next section.
Why isn’t . (the current directory) in PATH? Security. If the current directory were in PATH, and a folder someone sent you contained a malicious file named ls, typing ls might run it instead of the real ls. That’s why you run a script in your own directory with a leading ./: ./greet.sh. It means “really run the one right here”.
All along we’ve just said “the shell is bash”. But the shell is actually a replaceable part, and it comes in many varieties. First, let’s be clear: the shell is a program that does two jobs at once. On one hand it’s a command interpreter (you type, it runs); on the other it’s a small programming language — it has variables, conditionals, loops; you can write a sequence of commands into a file and run it as a script. So changing the shell changes not just the look of the prompt but the rules of the language.
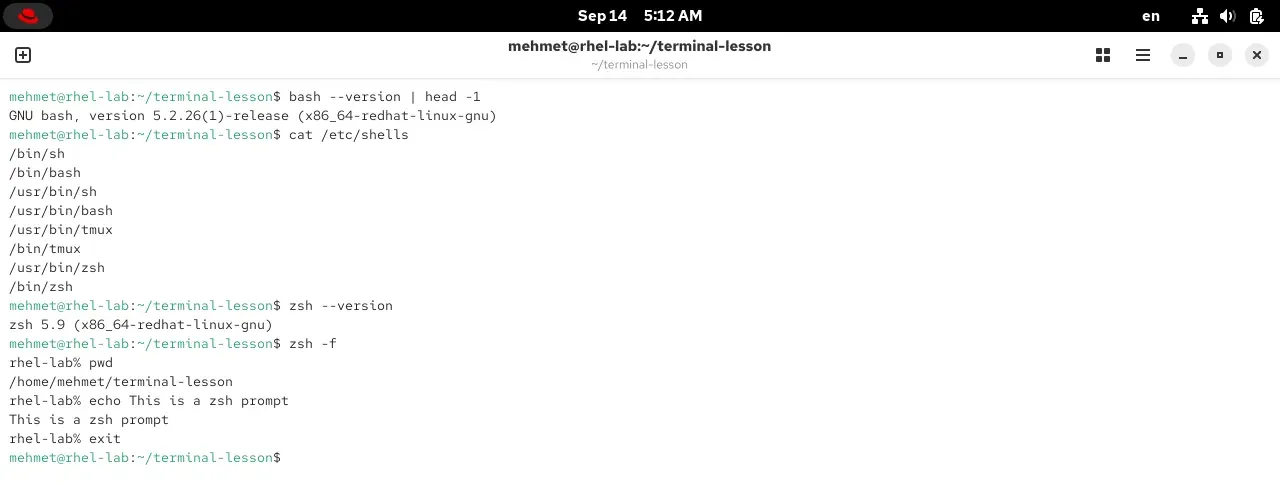
The /etc/shells file tells you which shells are installed on your machine; you can even switch into another shell and come back:
bash 5.2; /etc/shells lists the installed shells (I just installed zsh). zsh -f switched into zsh and the prompt changed from $ to %; exit returned me to bash. Changing shells is that easy.
As you see on the screen: bash --version gave the version, /etc/shells listed the installed shells, zsh -f switched into zsh (notice the prompt changed from $ to %), and exit returned me to bash. So where did all these varieties come from? A short family tree:
flowchart TD
    T["Thompson shell<br/>1971"] --> B["sh · 1979"]
    T --> C["csh · 1978"]
    B --> K["ksh · 1983"]
    B --> BA["bash · 1989"]
    B --> DA["dash · 2002"]
    C --> TC["tcsh · 1983"]
    K --> Z["zsh · 1990"]
    Z --> F["fish · 2005"]
Let’s meet them one by one:
sh (the Bourne shell), 1979. The ancestor shell, written by Stephen Bourne at Bell Labs. Plain for interactive use, but it laid the foundation of scripting; you still see #!/bin/sh at the top of scripts today. On modern systems /bin/sh is often linked to a smaller relative (dash).
csh / tcsh, 1978–1983. Bill Joy (a founder of BSD and later Sun, mentioned in Part 1) wrote it with a C-like syntax; among the first to bring interactive conveniences like history and aliases. tcsh improved it by adding completion. Its scripting side is troublesome, so it’s little used today.
ksh (the Korn shell), 1983. David Korn combined sh’s scripting power with csh’s interactive comfort. It was the standard on commercial Unix for many years.
bash (Bourne Again Shell), 1989. Brian Fox wrote it for the GNU project (Stallman’s project from Part 1). The name is a pun: Bourne Again SHell, both “Bourne reborn” and the English “born again”. It’s compatible with sh but adds history, Tab completion, job control and much more. The default on Linux and almost every server; it’s what we use in this series.
dash, 2002. A very small and fast sh. Designed not for interactive use but for running scripts quickly; it’s the /bin/sh on Debian and Ubuntu. It doesn’t ship separately on RHEL.
zsh (the Z shell), 1990. Written by Paul Falstad, very similar to bash but ahead of it for interactive use: smart completion, spelling correction, a powerful plugin system (the famous oh-my-zsh). Apple has used it as the default on macOS since 2019.
fish (friendly interactive shell), 2005. As the name says, the friendliest for beginners: syntax highlighting out of the box, suggestions that appear as you type (autosuggestions), and genuinely good completion. Its one catch: the syntax differs from bash/sh, so ready-made bash scripts don’t run directly in fish.
The most important line between them is this: POSIX compatibility. sh, bash, ksh, zsh and dash share the same basic syntax (the POSIX standard); a script you write in one largely runs in the others. fish and csh are outside this family; more comfortable, but not portable.
Every time the shell opens, before you type anything, it reads a few config files. You write your aliases, environment variables and PATH additions into these files so they’re ready in every new terminal. In bash these files’ names start with a dot (so they’re hidden) and most end in rc; rc comes from “run commands”, a convention dating back to the 1960s.
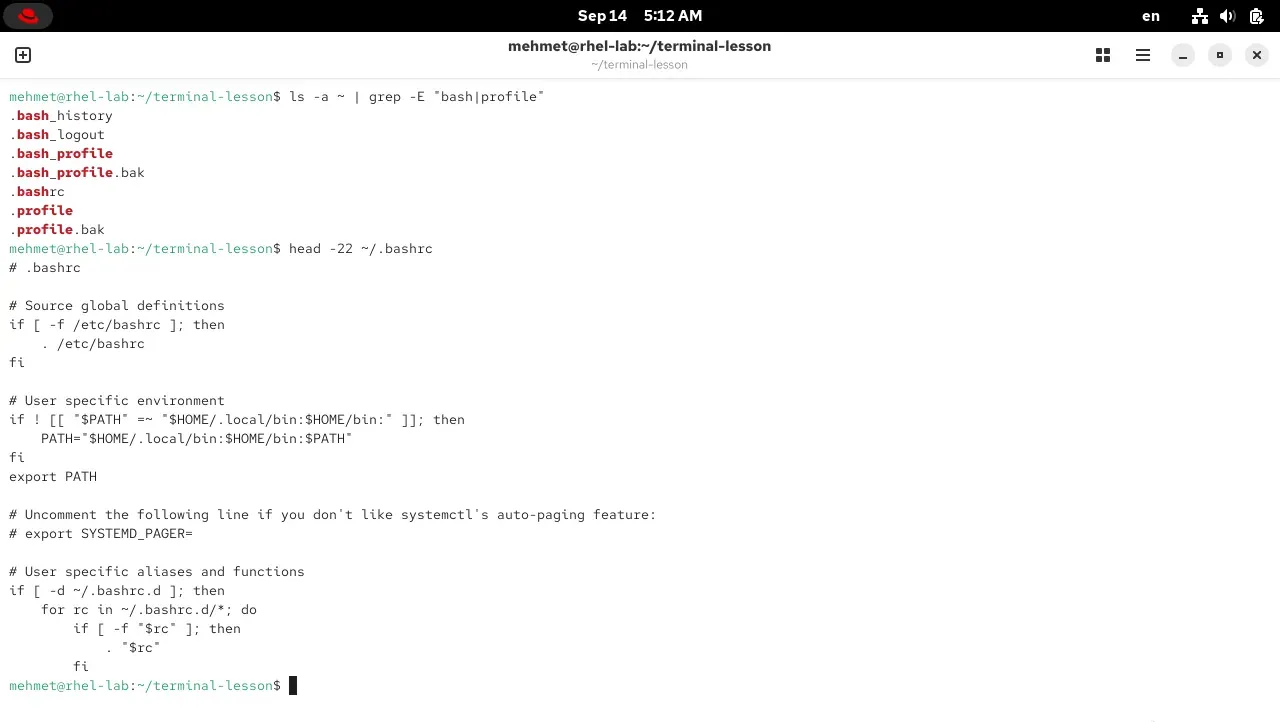
The config files in the home directory (.bashrc, .bash_profile) and RHEL's default .bashrc: it calls /etc/bashrc, adds ~/.local/bin to PATH, and loads the pieces under ~/.bashrc.d/.
On the screen you see the files in the home directory and RHEL’s default .bashrc. There are two main files:
.bashrc — read on every interactive shell start (when you open a new terminal tab). Your aliases and everyday settings go here.
.bash_profile — read only by a login shell (your first login to the machine or over SSH). On RHEL this file already calls .bashrc, so most of the time you only deal with .bashrc.
RHEL’s default .bashrc does three things, all familiar: it calls the system-wide /etc/bashrc, adds ~/.local/bin to PATH (the PATH persistence we just discussed happens right here) and loads the piece-settings in the ~/.bashrc.d/ folder.
Now let’s add our own settings. Two basic tools: the alias and the environment variable.
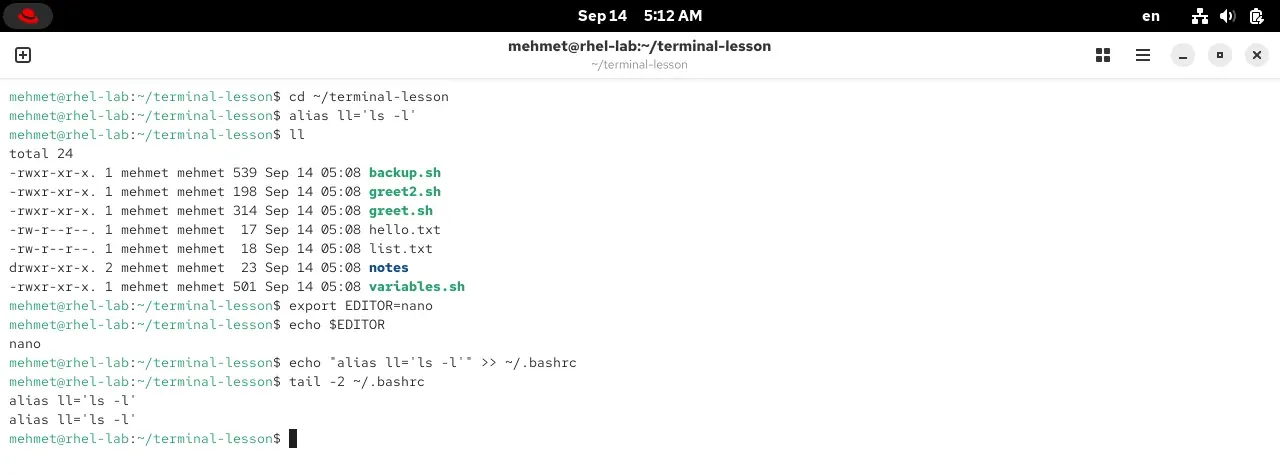
alias ll='ls -l' is a shortcut; export EDITOR=nano is an environment variable. To make the alias permanent I appended it to .bashrc with >>; tail -2 shows the last lines.
Alias: a short name for a long command. Type alias ll='ls -l' and from then on ll is enough. But an alias defined like this lives only in that terminal. To make it permanent you add it to .bashrc: echo "alias ll='ls -l'" >> ~/.bashrc. The >> on screen means “append to the end of the file”; a single > would overwrite the file, wiping what’s in it. Careful!
Environment variable: settings that programs read. Type export EDITOR=nano and programs that ask you for an editor will open nano. $PATH, and $JAVA_HOME from the Java post, are both environment variables; you peek inside one with echo $VAR.
After changing a file you either open a new terminal or re-read the file with source ~/.bashrc (source means “run the commands in this file now”). Which file is read when goes like this:
flowchart TD
    A["The shell opened"] --> B{"A login shell?<br/>first login to the machine or over SSH"}
    B -->|"Yes"| C["/etc/profile<br/>then ~/.bash_profile<br/>(which calls ~/.bashrc)"]
    B -->|"No: a new terminal tab"| D["/etc/bashrc<br/>then ~/.bashrc"]
    C --> E["Aliases, PATH and<br/>variables ready"]
    D --> E
We said the shell is a small programming language; let’s prove it. A script is nothing but commands written one under another in a file; the shell runs them in order. Remember the steps you wrote on paper in the Algorithms series; a script is their counterpart on a real machine.
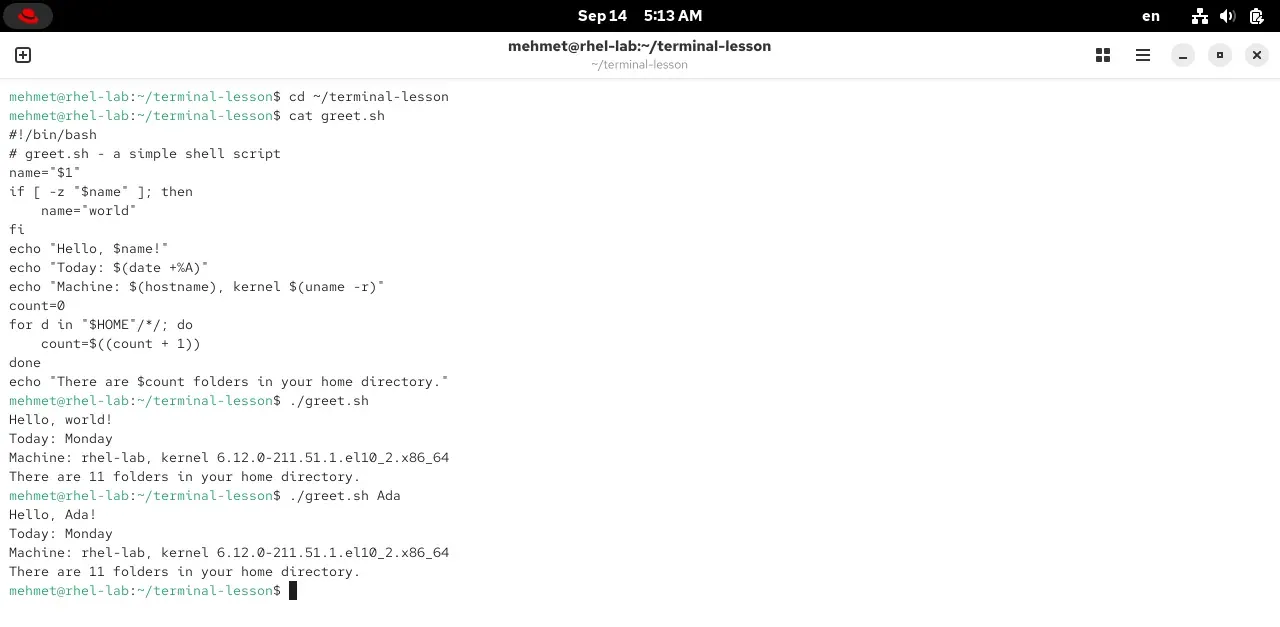
greet.sh: a shebang, a comment, a variable, an argument ($1), a condition (if), command substitution ($(...)) and a loop (for). Run with no argument it greets 'world'; ./greet.sh Ada greets 'Ada'.
Let’s read the greet.sh script on screen line by line:
#!/bin/bash — the first line, called the shebang: it means “run this file with bash”. It sits at the very top of every script.
# ... — lines starting with # are comments; the shell doesn’t run them, they’re for humans to read.
name="$1" — a variable. The mailbox from the Variables post: its name is name, and we put a value in it. $1 is the first argument given to the script from outside (if you say ./greet.sh Ada then $1 = Ada). Careful: there are no spaces around the = (name = "..." is an error).
if [ -z "$name" ]; then ... fi — a condition. The bash form of the IF ... THEN ... ENDIF from pseudocode. -z means “is empty”: if the user gave no name, we set name to “world”. You read a variable by putting $ in front of it.
echo "... $name ..." — the PRINT from pseudocode. Inside double quotes $name turns into its value; $(date +%A) is command substitution: it runs the command inside the parentheses and pastes its output there.
for d in "$HOME"/*/; do ... done — a loop. The FOR EACH ... ENDFOR from pseudocode. It bumps a counter by one for each folder in the home directory ($(( ... )) does arithmetic).
Running a script takes two conditions. First you make the file executable:chmod +x greet.sh (once is enough). Then you put ./ in front and say ./greet.sh; remember . isn’t in PATH, so the ./ is required. We’ll discuss permissions at length in Part 6; for now +x meaning “this file is a program, it’s executable” is enough.
And if you want to run the script from anywhere, without ./? This is exactly where PATH comes in:
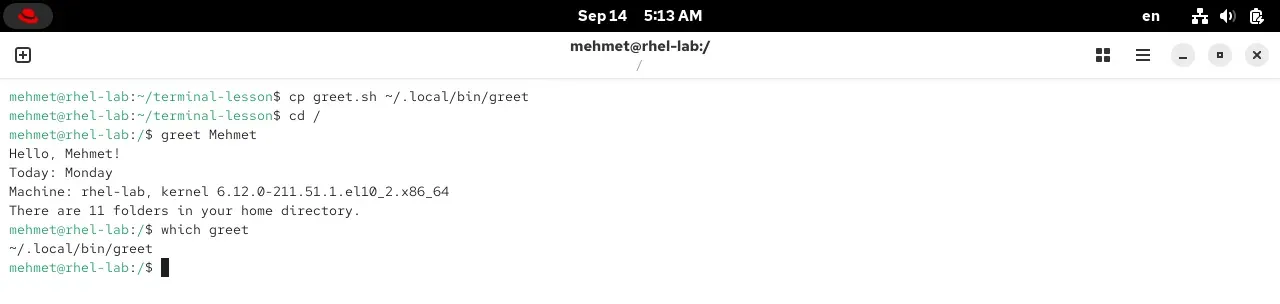
I copied the script into ~/.local/bin (RHEL adds that folder to PATH). Now even from the root directory just 'greet Mehmet' works; which greet confirms where it was found.
I copied the script into the ~/.local/bin folder (RHEL’s .bashrc was adding it to PATH, remember). Now no matter which directory I’m in, just typing greet is enough; the shell finds it in PATH and runs it. which greet confirms where it found it. Writing your own command and adding it to the system is that simple.
This little script is a start. Shell programming is the backbone of DevOps and system administration; everyone who sets up servers, takes backups, scans logs or ships releases writes scripts all day. So let’s get to know the basic building blocks a little more closely. Don’t panic: they’re all the bash spelling of the concepts you saw on paper in the Algorithms series.
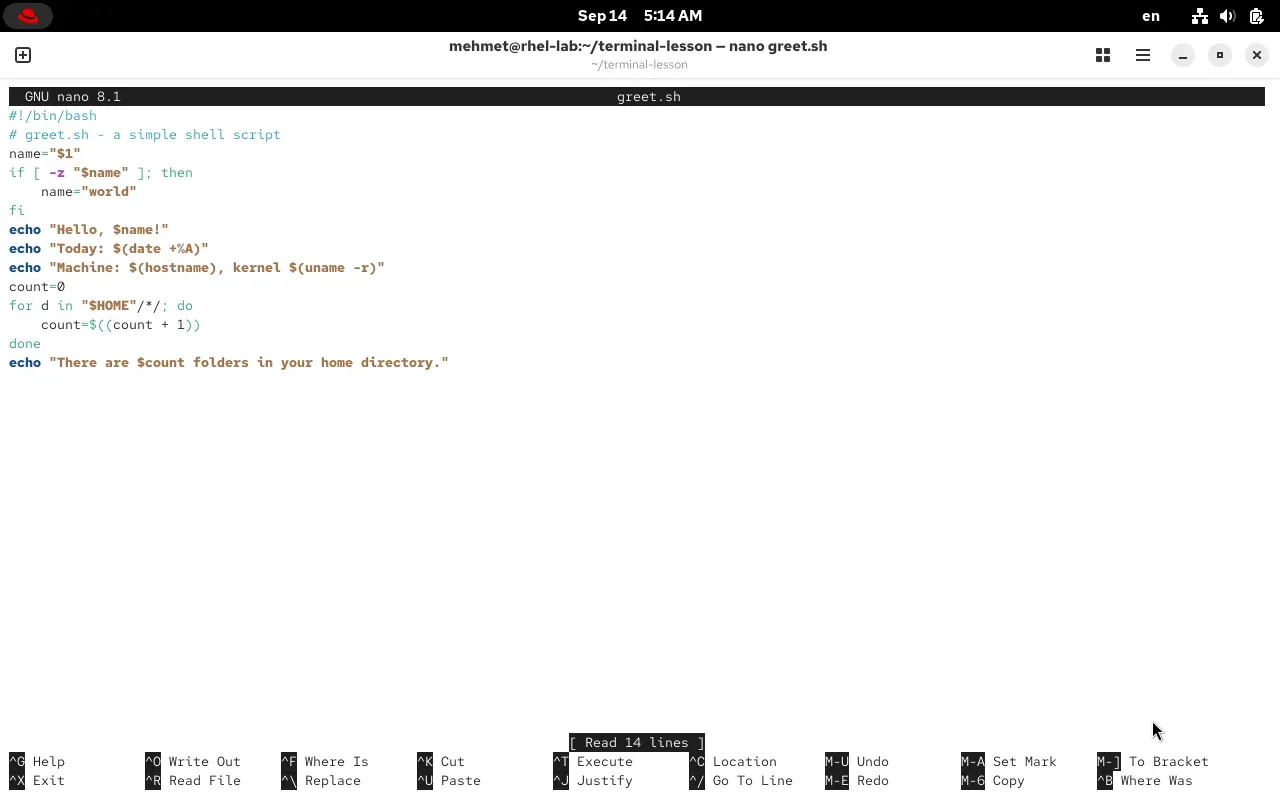
So far I’ve shown scripts ready-made; but how do you write one? A script is just a plain text file, so you write it in any text editor. Two editors open right in the shell, without leaving the terminal, and both are on every server.
nano is the beginner’s editor. Type nano greet.sh and the file opens, ready to type. The ^ at the bottom means Ctrl: Ctrl+O saves (write Out), Ctrl+X exits, Ctrl+W searches. Easy, intuitive, its cheat sheet always at the bottom of the screen.
nano greet.sh: a syntax-highlighting editor; at the bottom, Ctrl shortcuts like ^O Write Out (save) and ^X Exit. The easiest one for a beginner.
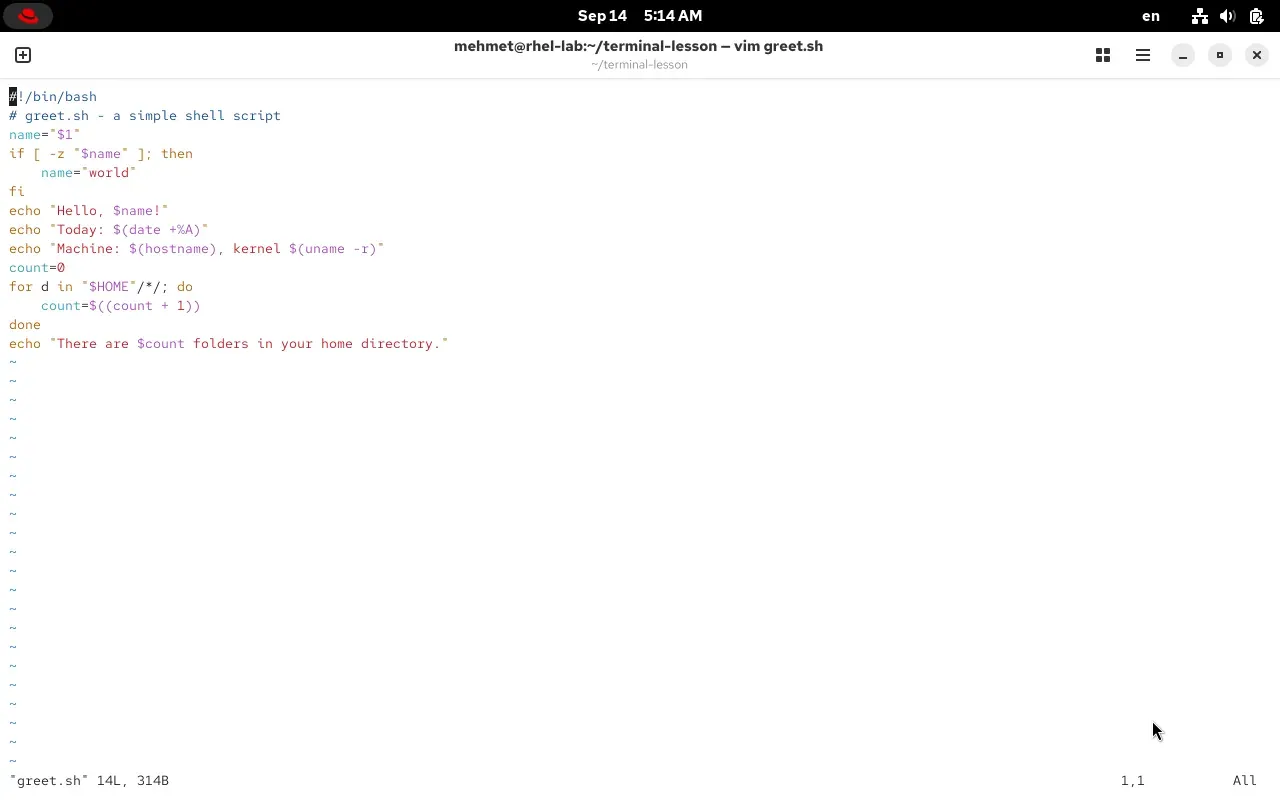
vim is the powerful, fast, everywhere-present editor. It opens with vim greet.sh. It has a twist: it’s modal. On opening it’s in normal mode (keys are commands); press i to enter insert mode and type, then Esc to return to normal mode. :w saves, :q quits (:wq both, :q! quits without saving). Confusing at first, but very fast once you’re used to it; on servers it’s often the only advanced editor you’ll find ready.
vim greet.sh: syntax highlighting, the ~ marks on the left are the empty lines past the end of the file, and the 'greet.sh 14L, 314B' status line at the bottom. Powerful but modal; the full walkthrough is in Part 5.
Don’t panic: we’ll cover vim from the ground up, patiently, in Part 5. For now, knowing how to open, type and save a script with nano is enough. On a graphical desktop you can use a windowed editor like GNOME Text Editor or VS Code too; a script is plain text, it doesn’t matter what you write it with. Not even the extension matters: .sh is a convention, what makes a script a script is the shebang on the first line.
A variable is the mailbox from the Variables post: a name with a value inside. In bash it’s very simple to define, with a few strict rules.
Definition and rules:
Assignment: ad="Ada". No spaces around the = (ad = "Ada" is an error; the most common mistake).
Reading: put $ in front: echo "$ad". To avoid ambiguity the braced form is safer: ${ad} (e.g. to write ${ad}lar joined together).
Name rule: letters, digits and underscore; can’t start with a digit and is case-sensitive (ad and Ad are different variables).
Removing: unset ad deletes the variable.
Quoting (the most common trap):
Double quotes "...": the $variable inside turns into its value. Always quote variables: "$file". Otherwise, if the value contains spaces, bash splits it (“word splitting”) and things break.
Single quotes '...': touch nothing, print exactly what’s inside. echo '$ad' prints $ad.
No quotes: both expands and splits; usually not what you want, so quote by habit.
Ways to produce a value:
$(...) command substitution: runs the command inside and inserts its output: today=$(date +%F).
$(( ... )) arithmetic:sum=$((2 + 3)) → 5.
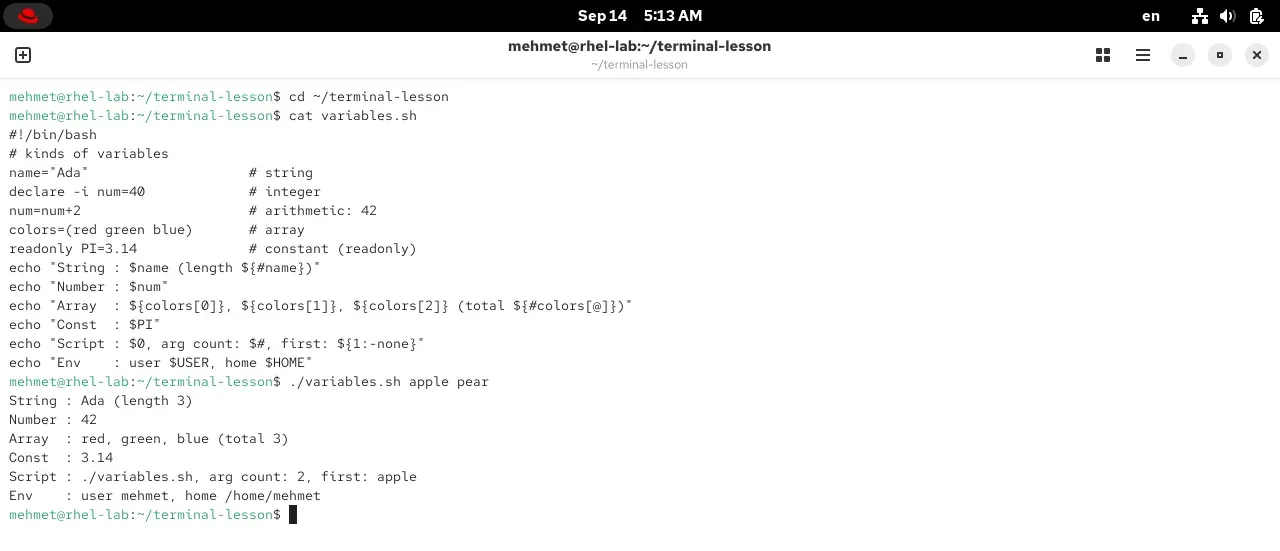
In bash a variable is a string by default (there’s no separate type declaration); even yas=40 is really the text “40”. But in practice we distinguish a few kinds:
variables.sh: a string, an integer with declare -i (40+2=42), an array, a readonly constant, and the $0/$#/$1/$USER/$HOME special and environment variables, all in one script.
String: the most common. ad="Ada".
Integer: with declare -i sayi=40 bash treats it as a number; sayi=sayi+2 becomes 42 directly.
Array: holds several values together. renkler=(red green blue); reach the first with ${renkler[0]}, all with ${renkler[@]}, the count with ${#renkler[@]}. For a key-value associative array, declare -A.
Constant (readonly):readonly PI=3.14 can’t be changed afterward; trying gives an error. We write constants in UPPERCASE by convention.
There are also special variables the shell gives you without you defining them:
Variable
Meaning
$0
the script’s name
$1, $2 …
arguments given to the script (1st, 2nd …)
$#
the number of arguments
$@
all arguments
$?
the last command’s exit code
$$
the running process’s number (PID)
$USER$HOME$PWD
user, home directory, current directory (environment variables)
The variables.sh on screen shows most of these together: a string and its length, an integer with declare -i, an array, a readonly constant, the $0/$#/$1 special variables and the $USER/$HOME environment variables.
Scope: shell variable or environment variable? An ordinary variable lives only in the shell that defined it. With export you turn it into an environment variable, and the programs that shell launches see it too: export EDITOR=nano. PATH and JAVA_HOME from the Java post are environment variables; that’s why they’re defined with export in .bashrc.
Playing with text: bash can slice and reshape a variable’s contents; these expansions come in handy often:
read takes input from the user and puts it into a variable; it makes a script interactive.
greet2.sh: read asks for a name and age, then greets differently based on the answer. What is your name? Ada, How old are you? 25 produces the 'adult' greeting.
greet2.sh
#!/bin/bash
read-rp"What is your name? "name
read-rp"How old are you? "age
if [ "$age"-ge18 ]; then
echo"Hello $name, welcome (adult)."
else
echo"Hello $name, welcome (young)."
fi
-p prints the prompt, -r takes the backslash literally (a good habit). The entered values land in ad and yas, then if decides.
The [ ... ] next to if is actually a command called test; if the expression inside is true, the then branch runs. The most-used tests:
Test
Meaning
[ -z "$x" ]
is x empty
[ -n "$x" ]
is x non-empty
[ "$a" = "$b" ]
are the strings equal
[ "$a" -eq "$b" ]
are the numbers equal
-gt-lt-ge-le
number ><≥≤
[ -f "$p" ]
is p a file
[ -d "$p" ]
is p a directory
[ -e "$p" ]
does p exist
Note that number comparison uses letters (-gt); the <> signs mean something else in the shell (redirection). To chain two commands use && (run the second if the first succeeded) and || (if it failed): mkdir backup && cd backup. When there are many options, case is cleaner:
You write repeated work once, bind it to a name, then call that name:
A function
greet() {
local person="$1"
echo"Hi, $person!"
}
greetAda# Hi, Ada!
greetMehmet# Hi, Mehmet!
local confines the variable to the function (it doesn’t pollute the outer variables). Arguments arrive as $1, $2, just like in a script. Functions keep long scripts readable and free of repetition; the bash form of the black box from the Functions post.
Every command leaves an exit code behind when it finishes: 0 = success, non-zero = error. You read the last command’s code with $?:
Exit code
ls/nonexistent2>/dev/null
echo"exit code: $?"# prints: exit code: 2
Your own script also ends with exit 0 (success) or exit 1 (error); the && and || chains from earlier rely on this code. Putting this line at the top of serious scripts is almost a tradition, called strict mode:
Strict mode
set-euopipefail
-e: stop the script at once if a command fails (don’t carry on silently and make a mess).
-u: error out if an undefined (misspelled) variable is used.
-o pipefail: don’t ignore a failure if any command in a pipeline (|) crashes.
There’s also trap for cleanup: it sets a command to run however the script ends (errors included), like trap 'rm -f "$tmp"' EXIT. Our backup script had set -euo pipefail on its first line; now you know why.
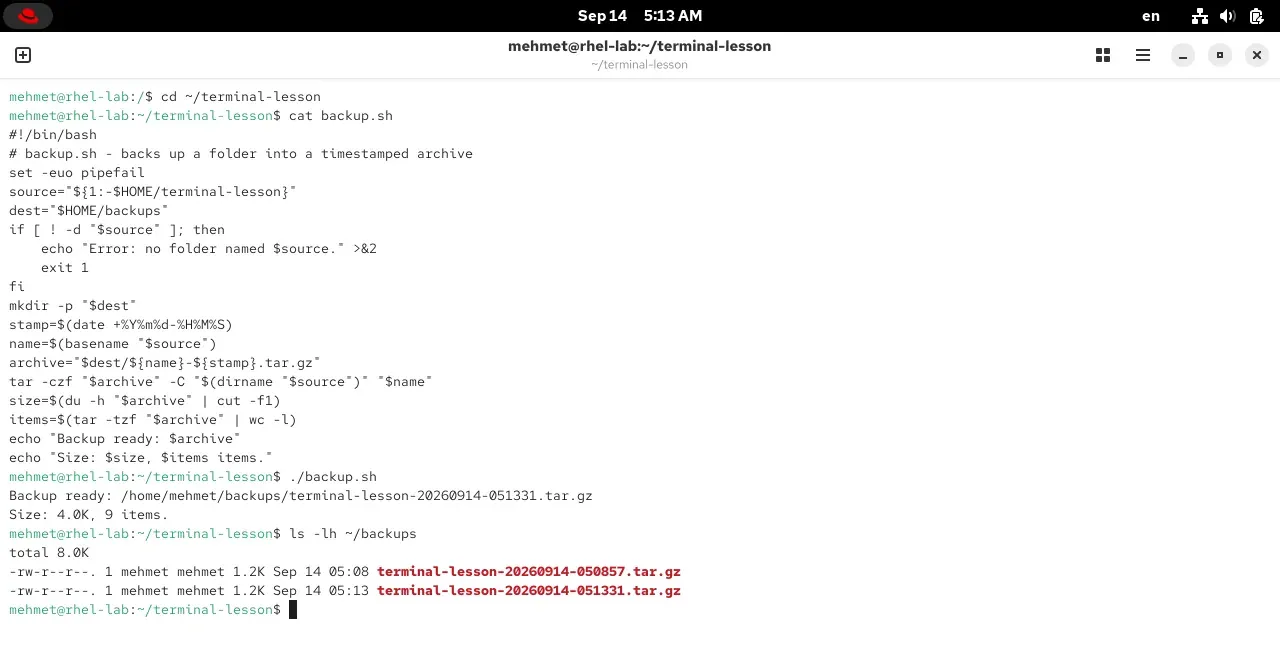
Now let’s look at a genuinely useful script that brings together what we’ve learned. It backs up a folder into a timestamped archive:
backup.sh uses almost every concept: strict mode, default argument, file test, command substitution. Running it created a timestamped archive like terminal-lesson-20260914-051331.tar.gz under ~/backups.
The script uses nearly every building block: strict mode (set -euo pipefail), a default argument (${1:-...}, falls back to terminal-lesson if no source is given), a file test ([ ! -d ... ], if the folder doesn’t exist it writes the error to the error stream with >&2 and exits with exit 1), command substitution ($(date ...), $(basename ...), $(dirname ...)), and after building the archive it reports its size (du -h | cut) and item count (tar -tzf | wc -l). Running it created a timestamped .tar.gz under ~/backups. Bind this script to the scheduler you’ll meet in a later part and it takes a backup by itself every night; that’s the very essence of automation.
The building blocks you’ve learned (variable, quoting, condition, loop, function, exit code) are exactly the foundation of DevOps and system administration. Setting up, updating, backing up, monitoring a server and shipping a new release all start as a shell script first. Later:
In Part 9 we’ll schedule these scripts with cron: “take a backup every night at 03:00”.
When you need the same job done across hundreds of servers at once, tools like Ansible step in; the same shell logic sits underneath them.
In modern software delivery (CI/CD), every step is made of small shell scripts.
So the three-line greet.sh you wrote today is really the first brick of a whole world. Learning shell programming isn’t memorizing one more command; it’s opening the door to making the machine do your work for you.
This time the questions are for the keyboard, not pen and paper. But answer each one in your head first, then try it on your machine; if your guess doesn’t match, that’s where the real learning begins.
A friend’s screen shows the prompt: root@web01:/var/log#. This line tells you four things: who, which machine, which directory, and an important warning. Work out all four.
If you type type cd, type ls and which cat you get three different kinds of answer. Which is from inside the shell, which is a shortcut, which is a program on disk?
You typed alias not='cd ~/terminal-lesson' and it works. But after you close and reopen the terminal, not says “command not found”. Why? How do you make it permanent?
We went from a guest in the terminal to being at home. You can now see where you are, get around, look up help when stuck, and type less to do more. Put the following in your pocket; we’ll use all of it in the coming parts.
What is the difference between the terminal, the shell and the prompt?
The three are nested ideas. The terminal is the window you type commands into (Ptyxis or GNOME Terminal on RHEL). The shell is the program running inside that window that reads and runs your commands; RHEL's default is bash. The prompt is the shell's invitation to type, for example the line mehmet@rhel-lab:~$. In short: the terminal is the counter, the shell is the clerk behind it, and the prompt is the clerk looking at you, waiting.
What does mehmet@rhel-lab:~$ in the prompt mean?
Four parts: mehmet is the user you logged in as, rhel-lab is the machine's name (hostname), ~ is the directory you're currently in (~ is shorthand for your home directory, /home/mehmet), and the final $ shows you're a normal user. If you were root (the administrator) you'd see # instead of $; that's why a # at the start of a command on the internet means "run this as administrator".
What do pwd, ls and cd do?
These three are the basics of moving around the terminal. pwd (print working directory) answers "where am I", printing the full path of the directory you're in. ls (list) shows what's in the current directory; ls -l is detailed (permissions, owner, size, date), ls -a shows hidden files too. cd (change directory) moves you between directories: cd Documents goes in, cd .. goes up one level, cd ~ goes home, cd - returns to the previous directory.
What is the difference between an absolute path and a relative path?
An absolute path starts at the root directory (/) and points to the same place from anywhere, for example /home/mehmet/Documents. A relative path is relative to where you are: Documents or ../Pictures. By analogy: an absolute path is a full postal address, a relative one is "two streets over". When in doubt, use pwd to see where you are, then build the relative path from there.
What do I do if I forget how to use a command?
Two quick ways. man command (for example man ls) opens that command's full manual; navigate with Space and the arrow keys, search with /word, quit with q. Shorter: command --help (for example ls --help) prints a summary of the command's options to the screen. Both work on every machine, without internet; they are the two things a sysadmin reaches for most.
What does the Tab key do in the terminal?
Tab is autocompletion, the terminal's most beloved feature. Type the start of a command or file name and press Tab, and the shell completes the rest: type cd ~/ter and press Tab and it becomes ~/terminal-lesson/. If there's a single possibility it completes at once; if there are several, pressing Tab twice lists them all. It saves time and prevents typos; never type long file names by hand, let Tab do it.
What is the shell, why do we use bash, and are there others like zsh?
The shell is the program that reads your commands and passes them to the operating system; it's also a small programming language (with variables, loops, conditionals). The default on RHEL and most servers is bash (Bourne Again Shell), the standard since 1989. There are alternatives: zsh (the default on macOS, loved for its plugins) and fish (friendly for beginners). We use bash in this series because it's what you always meet on servers; what you learn carries over to the others.
What does the output of echo $PATH mean?
PATH is the ordered list of folders the shell searches for commands, separated by colons (:). When you type ls, the shell looks through these folders in order and runs the ls program (/usr/bin/ls) when it finds it. We saw the same PATH in the Java post on installing the JDK; there, the JDK folder was added to this list so that javac could be found. If a command says "command not found", either it's misspelled or the program isn't in any of the PATH folders.
Why does type ls say "aliased to ls --color=auto"?
Because ls is actually an alias: RHEL has bound it to ls --color=auto so the output is colorized. The type command tells you what a name really is: type pwd says "shell builtin" (built into the shell itself), type ls reveals the alias, while the external program which ls shows the path /usr/bin/ls. So not everything you type in the terminal is the same kind of thing: some come from inside the shell, some from a program on disk, some from a shortcut.
Can I damage the system by typing something wrong in the terminal?
Every command in this part (pwd, ls, cd, man, echo, date) only looks, it changes nothing; experiment freely. Commands that can do harm (deleting, formatting, changing system settings) usually require sudo, and I'll introduce those carefully in later parts. The safest net is still the "clean install" snapshot you took in Part 2: if something goes wrong you roll the machine back to that state in seconds. If a command hangs, stop it with Ctrl+C; if the screen fills up, clear it with clear.
What is the .bashrc file, and how does it differ from .bash_profile?
.bashrc is the config file bash reads every time it opens (in a new terminal tab); you write your aliases, environment variables and PATH additions there so they are ready in every terminal. .bash_profile is read only by a login shell, i.e. when you first log in to the machine or over SSH. On RHEL, .bash_profile already calls .bashrc, so in practice you usually only deal with .bashrc. After changing a file, apply it at once with source ~/.bashrc or open a new terminal. The zsh equivalents are .zshrc and .zprofile.
How do I run a shell script?
Three steps: (1) write the commands into a file, with #!/bin/bash as the first line (called the shebang). (2) Make the file executable: chmod +x script.sh (once is enough). (3) Run it: if you are in the same directory you type ./script.sh; the leading ./ is required because, for security, the current directory is not on PATH. To call the script by name from anywhere, put it in a PATH folder like ~/.local/bin; RHEL already adds that folder to PATH via .bashrc.
How do I permanently add a folder to PATH?
Typing export PATH="$HOME/tools:$PATH" in the terminal only applies to that window; it is gone when you close it. To make it permanent, add the same line to your startup file ~/.bashrc, then run source ~/.bashrc. Put the folder at the front of $PATH to give your commands priority, or at the end so you do not shadow the system commands. On zsh you add the same line to ~/.zshrc; in the Java post we made JAVA_HOME and PATH permanent in exactly this way.
What does set -euo pipefail do?
It is the "strict mode", three settings put at the top of serious shell scripts. set -e stops the script the moment a command fails, so it does not blindly carry on after a broken step and make a mess. set -u errors out if you use an undefined (misspelled) variable, catching sneaky typos. set -o pipefail makes a failure visible if any command in a pipeline (cmd1 | cmd2) crashes. Together they protect your script from silent errors; it is a good habit even as a beginner.
What are exit codes and $??
Every command leaves a number behind when it finishes: the exit code. 0 means success, any non-zero value is an error (for example, file not found). You read the last command's exit code with $?: after ls /nonexistent, echo $? prints 2. Your own script also ends with exit 0 (success) or exit 1 (error). Chaining commands with && (run if the previous succeeded) and || (run if it failed) relies on this code too. Exit codes are how scripts and automation tools talk to each other.
Which editor do I write a shell script in?
Since a script is a plain text file, you write it in any text editor. The two most practical without leaving the terminal are nano and vim; both are on every server. nano is easiest for a beginner: type nano script.sh to open it, Ctrl+O saves, Ctrl+X exits (the ^ at the bottom means Ctrl). vim is more powerful but modal: press i to enter insert mode, Esc to leave it, :wq to save and quit; we cover vim in detail in Part 5. On a graphical desktop, GNOME Text Editor or VS Code work too. What runs a script is not the extension but the shebang on the first line (#!/bin/bash).
What kinds of variables are there in bash, and how do you define one?
When assigning there are no spaces around the =: ad="Ada"; to read it you put $ in front: "$ad". In bash a variable is a string by default, but there are kinds: string (ad="Ada"), integer (declare -i sayi=40), array (renkler=(a b c), accessed with ${renkler[0]}), and an unchangeable constant (readonly PI=3.14). There are also special variables the shell provides: $0 the script name, $1/$2 arguments, $# the argument count, $? the exit code, and environment variables like $USER/$HOME/$PATH. If you export a variable it becomes an environment variable, visible to the programs that shell launches.