Red Hat: Installing RHEL Step by Step
Install RHEL 10 in a virtual machine with the free developer subscription: Red Hat account, ISO, VirtualBox, Anaconda step by step, registration, first update.
Series · Red Hat
- 1. Red Hat: What Is Red Hat and How Does It Relate to Linux?
- 2. Red Hat: Installing RHEL Step by Step
- 3. Red Hat: The Terminal and the Shell
- 4. Red Hat: The Linux File System
In the first part we talked at length: Linux is an engine, a distribution is the car around the engine, Red Hat is the company that sells that car with a ten-year warranty. Today we stop talking and pull the car into the garage: we’re installing RHEL on your own computer. Without paying a penny, because today we’ll actually get the free developer subscription I described in part 1.
By the end of this post you’ll have a running, updated RHEL machine registered to your Red Hat account. The rest of the series happens on that machine: the terminal, files, users, packages, services… all of it here. So this part reads a bit like a recipe: step by step, screen by screen. Remember how we broke brewing tea into steps in the first Algorithms post? An installation is exactly an algorithm. Follow the order and the tea is ready at the end.
Two concepts first: ISO and virtual machine
There are two new words, and let’s settle both before the installation.
An ISO file is an installation disc squeezed into a single file. Operating systems used to come on DVDs; an ISO is a byte-for-byte copy of everything on that DVD (the name comes from the organisation that wrote the CD standard). There are no DVDs any more, but the file remains: you either write it to a USB stick and boot a real computer from it, or you attach it to a virtual machine as a “virtual DVD”. We’ll do the second.
A virtual machine (VM for short) is a second computer running inside your computer. A program sets aside part of the processor and memory and presents them “as if they were a separate computer”; you install whatever operating system you like on that virtual computer. The program that does this is called a hypervisor; VirtualBox, UTM and GNOME Boxes are hypervisors. Your actual computer is called the host, the virtual computer inside it the guest.
flowchart TD
    HW["Real hardware<br/>your computer's processor, memory, disk"]
    HW --> HOST["Host operating system<br/>Windows, macOS or Linux"]
    HOST --> HV["Hypervisor<br/>VirtualBox, UTM, GNOME Boxes"]
    HV --> VM["Guest virtual machine: RHEL<br/>its own kernel, its own disk (a file),<br/>its own network card; all in one window"]
Why not install directly on the computer? Three reasons. First, safety: it runs alongside Windows or macOS without touching them. Second, courage: in this series I want you to break things; when something breaks in a virtual machine you either roll back to a snapshot or delete it and reinstall in fifteen minutes. Third, realism: most of the RHEL servers you’ll meet at work are virtual machines already, just running inside a bigger hypervisor (VMware, KVM or a cloud). If you remember the apartment manager analogy from part 1: the hypervisor is like a contractor building a second apartment block inside the first.
Which hypervisor?
| Your computer | My suggestion | Note |
|---|---|---|
| Windows | VirtualBox (free) | VMware Workstation is also free for personal use |
| Intel Mac | VirtualBox | The same x86_64 ISO |
| Apple Silicon Mac (M1, M2, M3, M4) | UTM (free) | Download RHEL’s aarch64 ISO; in UTM choose “Virtualize”, not “Emulate” |
| Linux desktop (Fedora, Ubuntu, Pardus…) | GNOME Boxes or virt-manager | Uses the KVM in your system, the fastest |
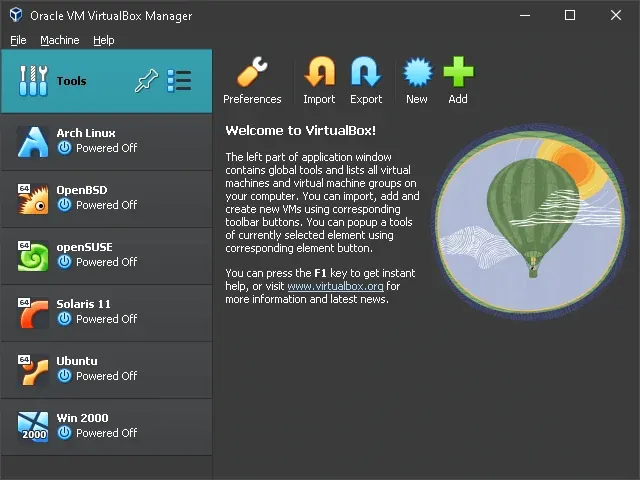
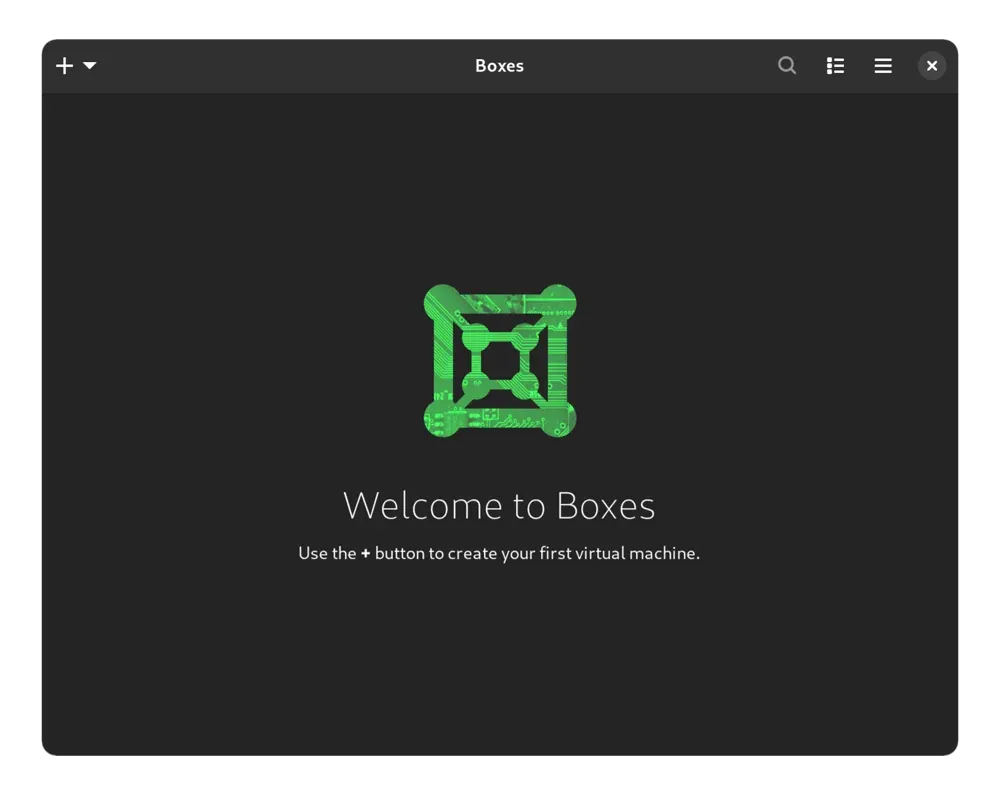
In this post I’ll describe the screens through VirtualBox; in UTM and Boxes only the “create a virtual machine” window differs, RHEL’s own installation screens are identical.
Booting from the ISO: behind the scenes
Before we start the installation, let’s see once what happens when we say “boot the virtual machine from the ISO”; because this chain is the very boot chain I described in part 1, only from an ISO instead of a disk.
flowchart TD
    A["The virtual machine's BIOS starts,<br/>looks for a boot record on the ISO"] --> B["GRUB 2 loads<br/>(the menu you see on screen)"]
    B --> C["The kernel (vmlinuz) and the initial RAM disk<br/>(initrd.img) are loaded into memory"]
    C --> D["Test this media: the ISO's checksum is verified"]
    D --> E["The installer's second stage (install.img)<br/>is read from the ISO, a graphical session starts"]
    E --> F["Anaconda: the Installation Summary screen"]
Every ISO contains a small boot area defined by a standard left over from the CD era (El Torito); the BIOS finds it and runs GRUB 2. The four lines you see in the menu are GRUB’s lines. Once a choice is made, GRUB loads two files into memory: the kernel (the engine from part 1; the file is called vmlinuz) and the initrd, a compressed mini file system holding just enough drivers and tools for the kernel to find the disk and the ISO. The kernel wakes up, finds the ISO and reads the installer’s actual body (install.img). That body is the program called Anaconda.
Step 1: a Red Hat account and the free subscription
In part 1 I described the subscription model: RHEL’s code is open, but getting the edition Red Hat tests and packages, and its updates, takes a subscription. For individual developers that subscription is free and valid for up to 16 systems. Getting it takes five minutes.
- In a browser go to developers.redhat.com and click the Register link at the top right. It asks for an email, name, username and password; a Red Hat account is created.
- Click the verification link in your email and log in.
- On first login, accept the terms of use. The moment the account is created, the Red Hat Developer Subscription for Individuals is added to it; there is nothing to buy and no card to enter.
- Note your username and password somewhere. We’ll be asked for them when registering the machine at the end of the installation.
The subscription is valid for a year; at the end of the year you log in to the same site, re-accept the terms, and it renews. One more thing: this account isn’t only for downloading the ISO; it’s also your ticket to Red Hat’s documentation, knowledge base and support portal. You’ll be visiting often after the installation.
Step 2: downloading the ISO
- While logged in with your account, go to developers.redhat.com/products/rhel/download.
- Pick the newest major release: at the time of writing, RHEL 10.
- Pick the architecture for your processor: x86_64 for Windows, Linux and Intel Macs; aarch64 for Apple Silicon Macs.
- There are two ISOs. The Boot ISO (1 GB) contains only the installer; it downloads the packages from Red Hat’s servers during installation and for that it asks you to register your account during the install. The DVD ISO (about 10 GB) carries everything inside; registration can wait. I used the Boot ISO: you already have the account, and registering during installation is the shortest route. The rest of the post follows that route; if you picked the DVD ISO the only difference is registering from the terminal in step 5.
- When the download finishes you have a file named
rhel-10.2-x86_64-boot.iso(orrhel-10.2-x86_64-dvd.isoif you chose the DVD). Read the name like the package names in part 1:rhelthe product,10.2the release,x86_64the architecture,bootordvdthe ISO type.
Step 3: creating the virtual machine
Now we build the guest computer: there’s nothing in it yet, just a case, memory and an empty disk. I’m assuming you’ve downloaded and installed VirtualBox from virtualbox.org.
- Open VirtualBox and press New.
- Name:
rhel-lab. VirtualBox picks the type itself when it sees the name; if it doesn’t, Type: Linux, Version: Red Hat (64-bit). - ISO Image: select the ISO file you just downloaded.
- Tick Skip Unattended Installation. VirtualBox 7’s “unattended install” feature means well but gives half-baked results with RHEL; we’ll do the installation ourselves, which is the whole point anyway.
- Hardware: Base Memory 4096 MB (2048 if your computer has 4 GB), Processors 2.
- Hard Disk: create a new virtual disk. 30 GB is enough; I gave it 90 GB so that there is room for the disk experiments in part 11 (on a disk larger than 50 GB Anaconda creates a separate
/homepartition, as you’ll see shortly). Leave “Pre-allocate” unticked; the disk file grows as it’s used and doesn’t take up the full size right away. - Finish.
rhel-labappears in the list. Don’t start it yet.
If you’re using Boxes: + → Install from file → select the ISO → set memory and disk to the same values. In UTM: Create a New Virtual Machine → Virtualize → Linux → select the ISO → memory 4096 MB, 2 cores, disk 30 GB. In all three the result is the same: a virtual computer with the ISO attached and an empty disk.
Alternative: installing on a real machine
Throughout this series we’ll use a virtual machine; it’s the safest way to learn, because if you break something you roll back to a snapshot and your host computer is untouched. But you may also want to install RHEL on a real computer, straight onto the hardware: to turn an old laptop into a Linux lab, to get full performance, or to set up a server. Two things then change; you write the installation medium to a USB stick and boot the machine from that USB through the BIOS/UEFI. From there on it’s the same Anaconda screens you’re about to see.
1. Writing the ISO to a USB stick
The ISO you downloaded is a disc image; copying it onto the USB like a file isn’t enough, it has to be “written” (flashed). A 4 GB stick is enough for the Boot ISO, 16 GB for the DVD ISO; the process erases everything on the stick. Tools:
| Tool | Platform | Note |
|---|---|---|
| Fedora Media Writer | Windows, macOS, Linux | The easiest: pick the ISO and the USB, Write. A perfect fit for the Red Hat family. |
| balenaEtcher | Windows, macOS, Linux | Simple and visual; writes in three steps. |
| Rufus | Windows | Advanced; if asked, choose DD Image mode. |
dd | Linux, macOS | Command line; the fastest but the most dangerous. |
For those who like the command line, dd (Linux). First find the USB’s name with lsblk (e.g. /dev/sdb); if you pick the wrong disk you erase its contents, so check twice:
lsblksudo dd if=rhel-10.2-x86_64-boot.iso of=/dev/sdb bs=4M status=progress oflag=syncOn macOS the same job is done by finding the disk with diskutil list and running sudo dd if=... of=/dev/rdiskN bs=4m.
2. Booting from the USB: BIOS/UEFI
Turn the computer off, plug in the USB, turn it on, and while the boot logo shows, press the boot menu key. The key varies by manufacturer; a line like “Boot Menu: F12” flashes on screen for a moment:
| Manufacturer | Boot menu | Firmware (setup) |
|---|---|---|
| Dell, Lenovo (most) | F12 | F2 |
| HP | F9 | Esc or F10 |
| Asus, MSI | F8 / F11 | Del |
| Acer | F12 | F2 |
From the menu pick your USB stick; its name carries the brand or “USB”, usually with a “UEFI:” prefix. If there’s no one-time menu, enter the firmware and move the USB ahead of the disk in the boot order. On Windows there’s another shortcut: Settings → System → Recovery → “Restart now” → boot from a device.
3. The rest is the same
Once it boots from the USB you get the GRUB menu described below; pick Install Red Hat Enterprise Linux 10.2. From here the Anaconda screens are identical to the ones on the virtual machine, and you can follow the rest of this post as it is. The only real difference is on the Installation Destination (Step 7) screen: there you see your own disk, not an “ATA VBOX HARDDISK”. If you’re installing only RHEL, pick the right disk and leave “Automatic”; if there’s another system that must stay on the disk (Windows, say), you’re into dual boot territory, which is a more advanced topic and deserves its own post. When the install finishes, remove the USB so the computer boots from the disk.
Step 4: installing with Anaconda
Start the virtual machine with Start (on a real machine: the same menu appears when you boot from the USB). It boots from the ISO and within a few seconds a menu appears. RHEL’s installer is called Anaconda; a program Red Hat has written since 1999, the same in Fedora and RHEL. The whole installation revolves around a single screen, shown on this map:
flowchart LR
    H["Installation Summary"] --> L["Localization"]
    H --> S["Software"]
    H --> Y["System"]
    H --> U["User Settings"]
    L --> L1["Keyboard<br/>Language Support<br/>Time & Date"]
    S --> S1["Connect to Red Hat (RHEL only)<br/>Installation Source<br/>Software Selection"]
    Y --> Y1["Installation Destination (disk)<br/>KDUMP<br/>Network & Host Name"]
    U --> U1["Root Account<br/>User Creation"]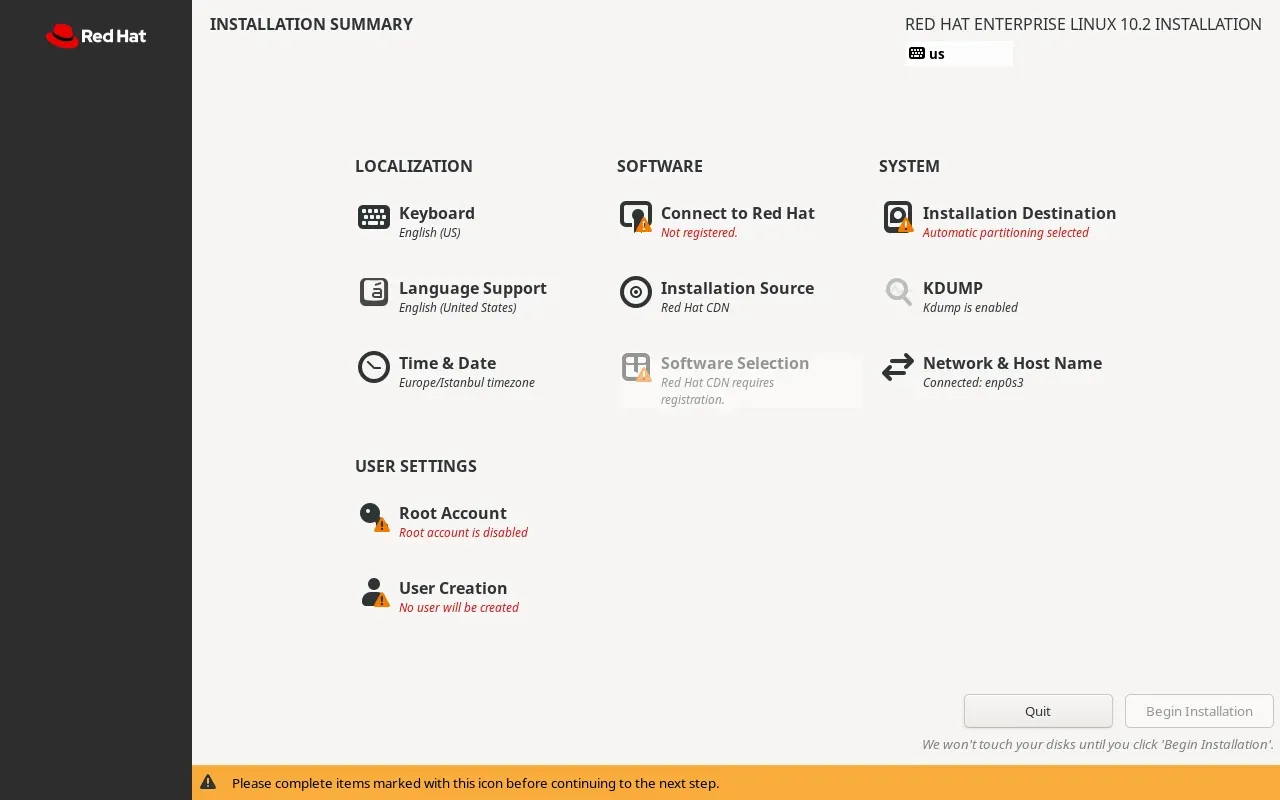
The nice thing about this screen is that you don’t have to go in order: you enter a box, set it, come back; once no box has a red warning mark left, the Begin Installation button unlocks. Now one by one:
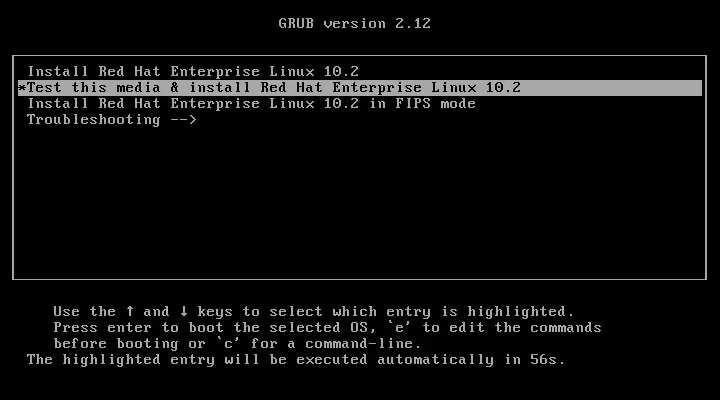
- Boot menu. The virtual machine boots from the ISO and the GRUB menu appears: Install Red Hat Enterprise Linux 10.2, Test this media & install (the default), FIPS mode and Troubleshooting. Leave the default selected and press Enter, or wait 60 seconds and it starts by itself. It verifies the ISO for a minute or two (the checksum business from earlier), then the installer loads.
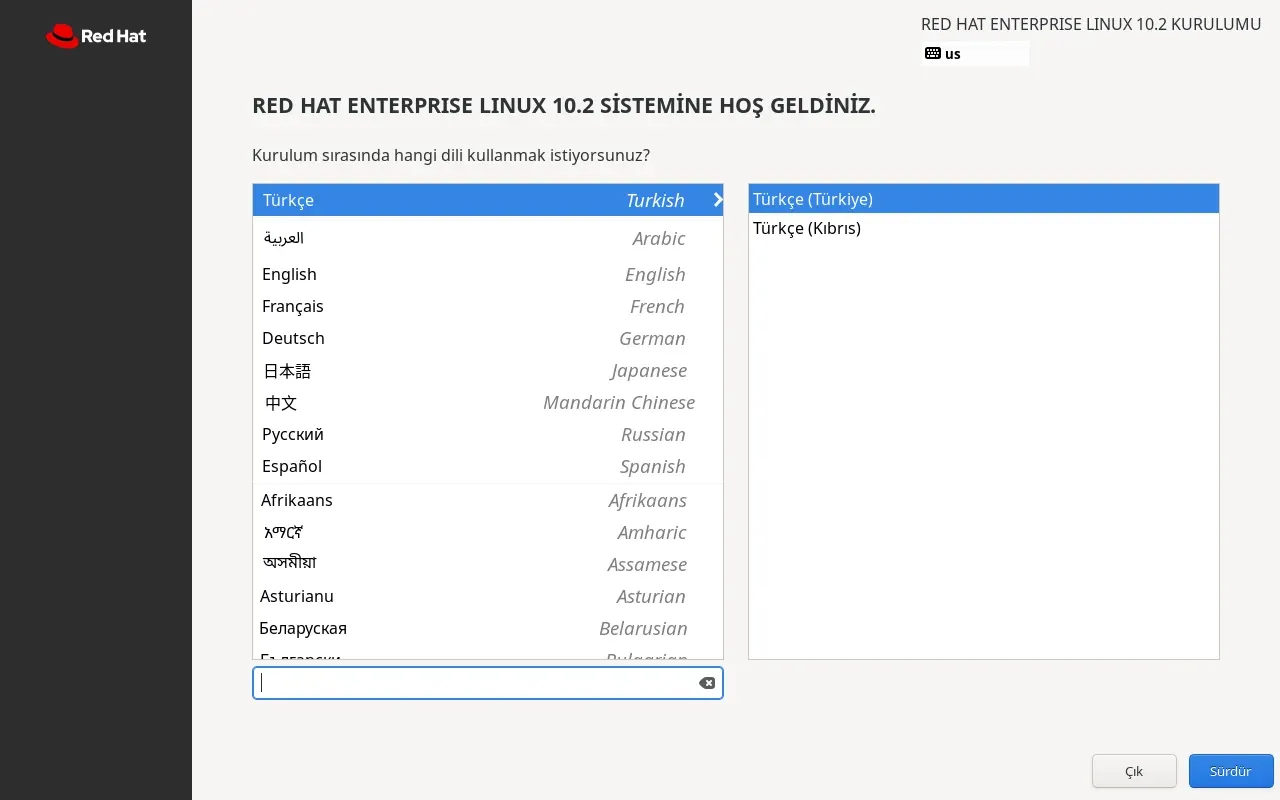
- Language. On the first screen you choose the language of the installer and of the system. The installer may look at your location and preselect your local language; it did so for me (Turkish). Pick English from the list and leave English (United States) on the right. The reason is in the box below. Continue.
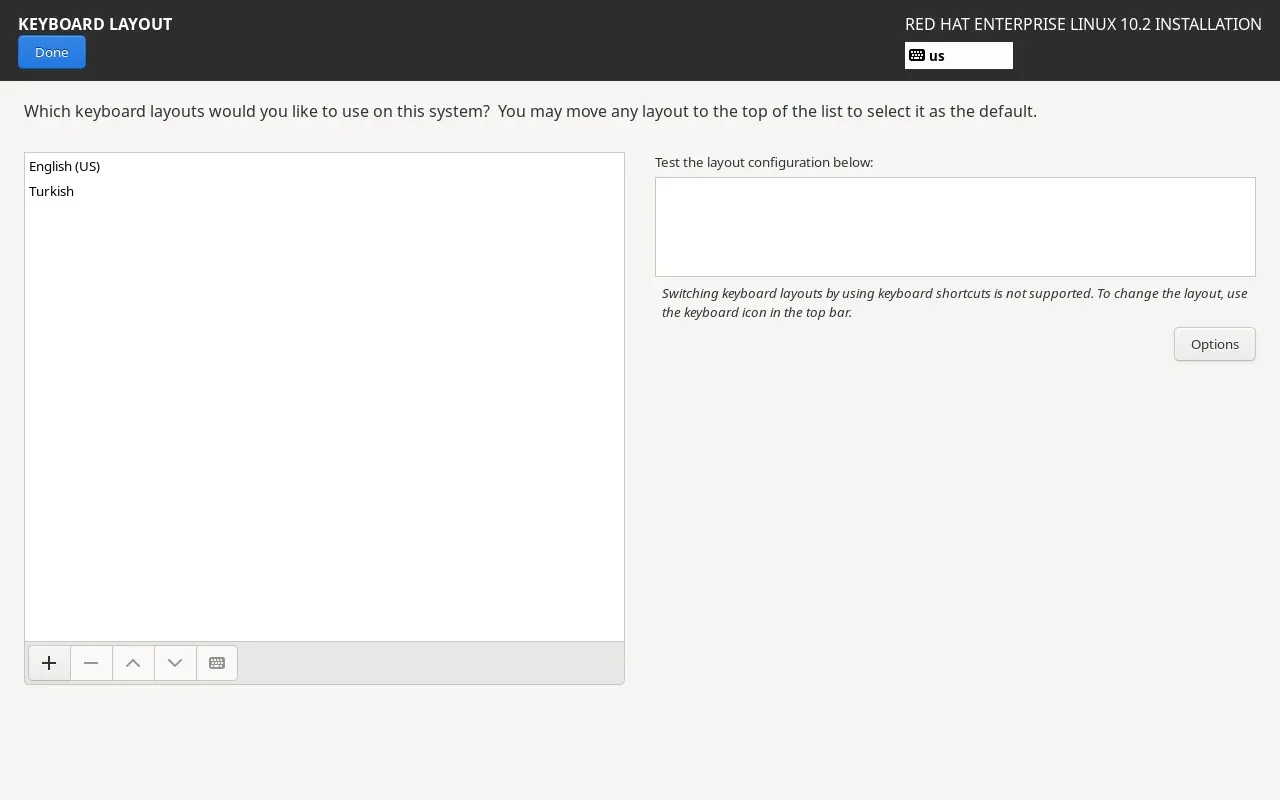
- Keyboard. In the Installation Summary open Keyboard. Only English (US) is in the list; press the plus button at the bottom, type your layout’s name in the window that opens (for Turkish,
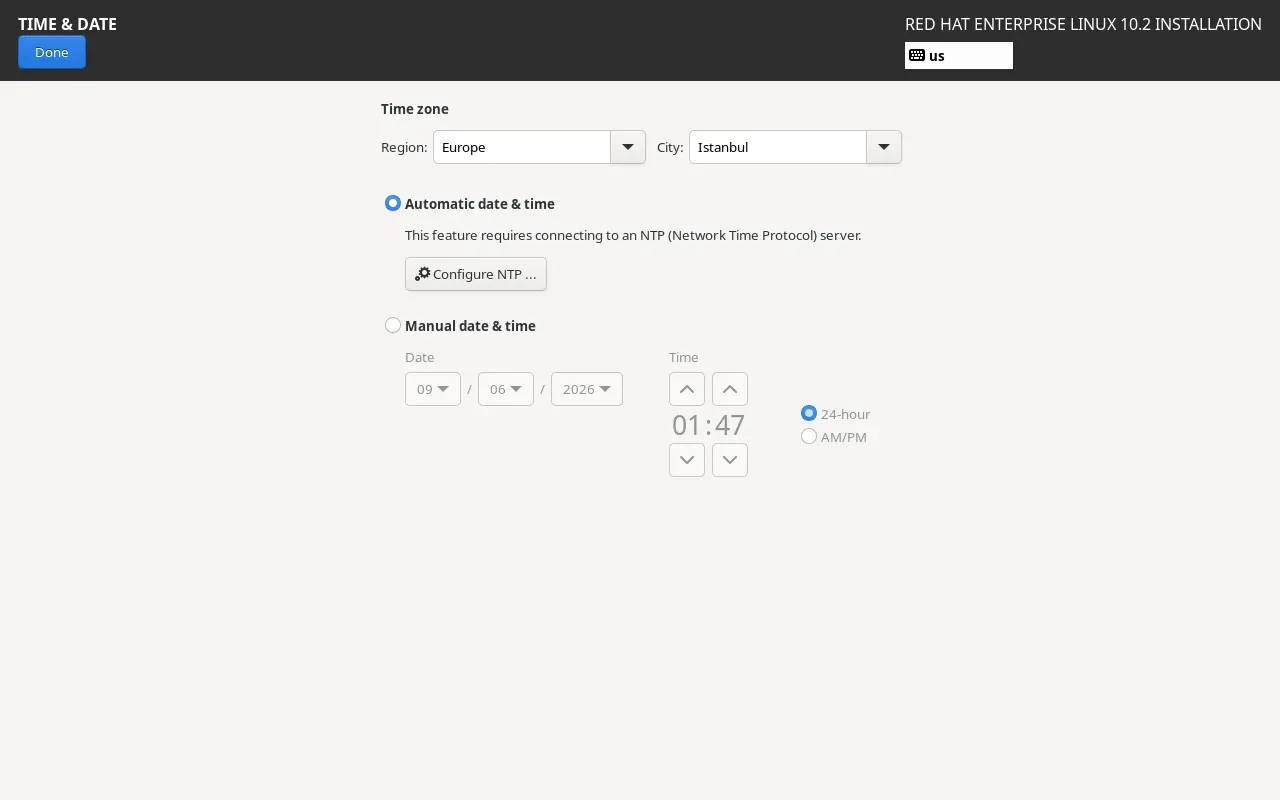
Turkish, or Turkish (F) for the F layout), select it, Add. Move it to the top with the up arrow and type a few characters in the box on the right to test. Done (the blue button at the top left). - Time & Date. There’s no map; there are two drop-down lists: Region and City (for Türkiye, Europe and Istanbul). It has most likely come up preselected from your location. Leave “Automatic date & time” on. Done.
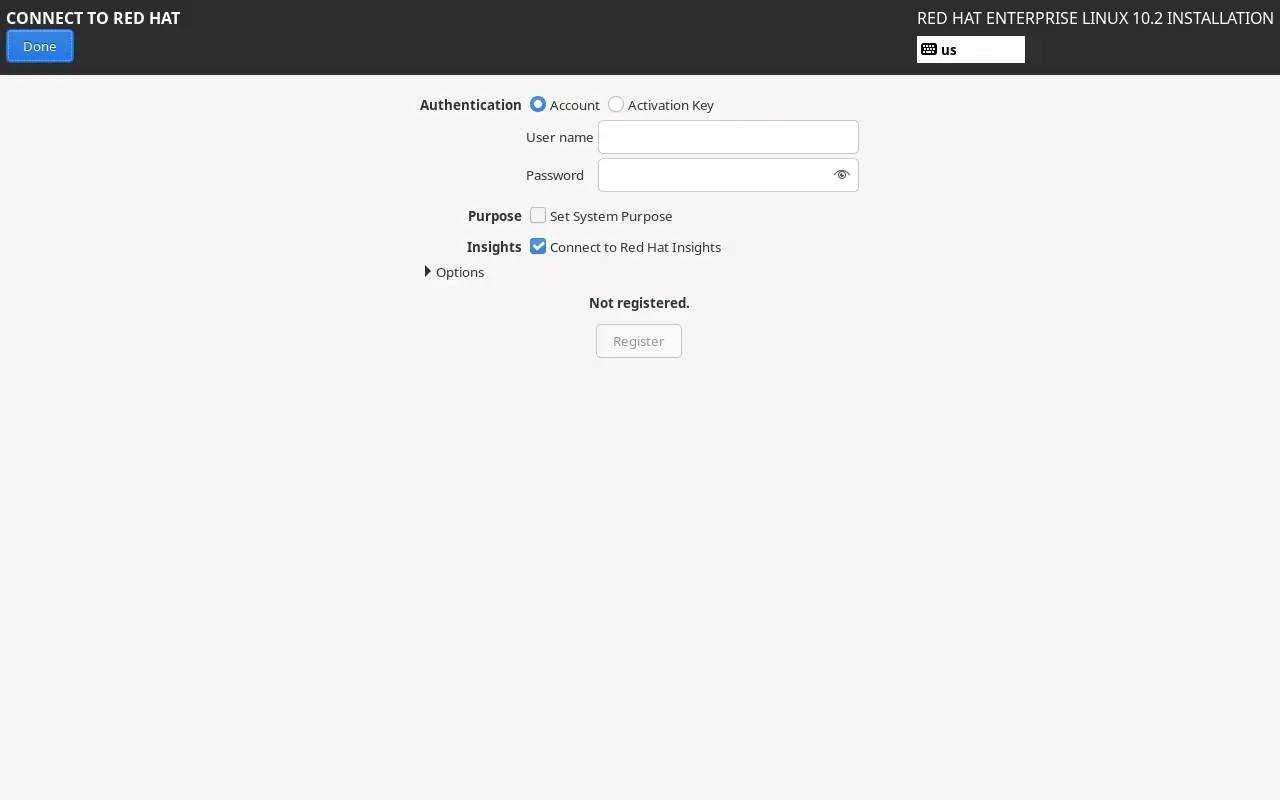
- Connect to Red Hat. With the Boot ISO this step is mandatory: until you register, the Software Selection box stays grey, saying “Red Hat CDN requires registration”. With Account selected, type your Red Hat username and password and press Register. After a few seconds “Not registered” changes to your registration details. Leave the “Connect to Red Hat Insights” box ticked; I described Insights in part 1. Done. (When installing from the DVD ISO you can skip this box and register from the terminal later; I show that in step 5.)
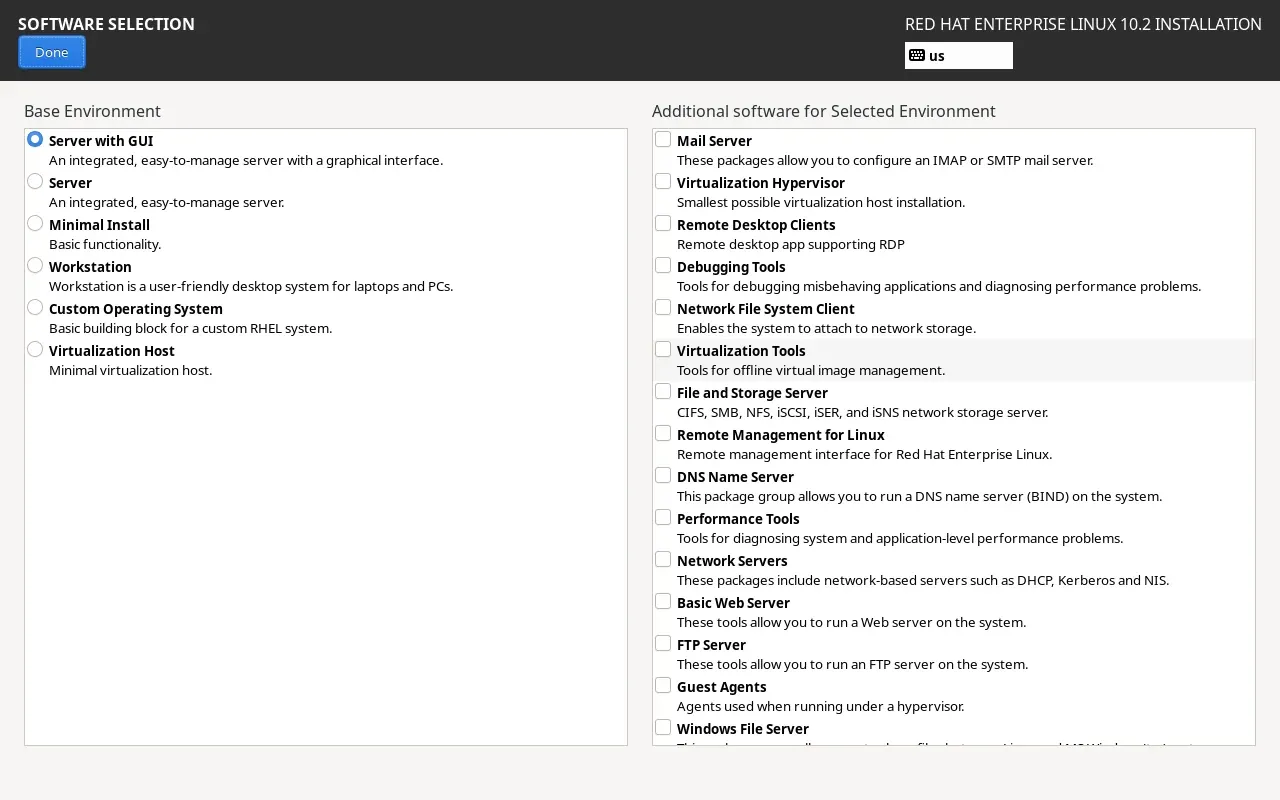
- Software Selection. The box unlocks after registration. From the list on the left choose Server with GUI (it came preselected for me); don’t touch the add-ons on the right. I explain what you’ve chosen in the box below. Done.
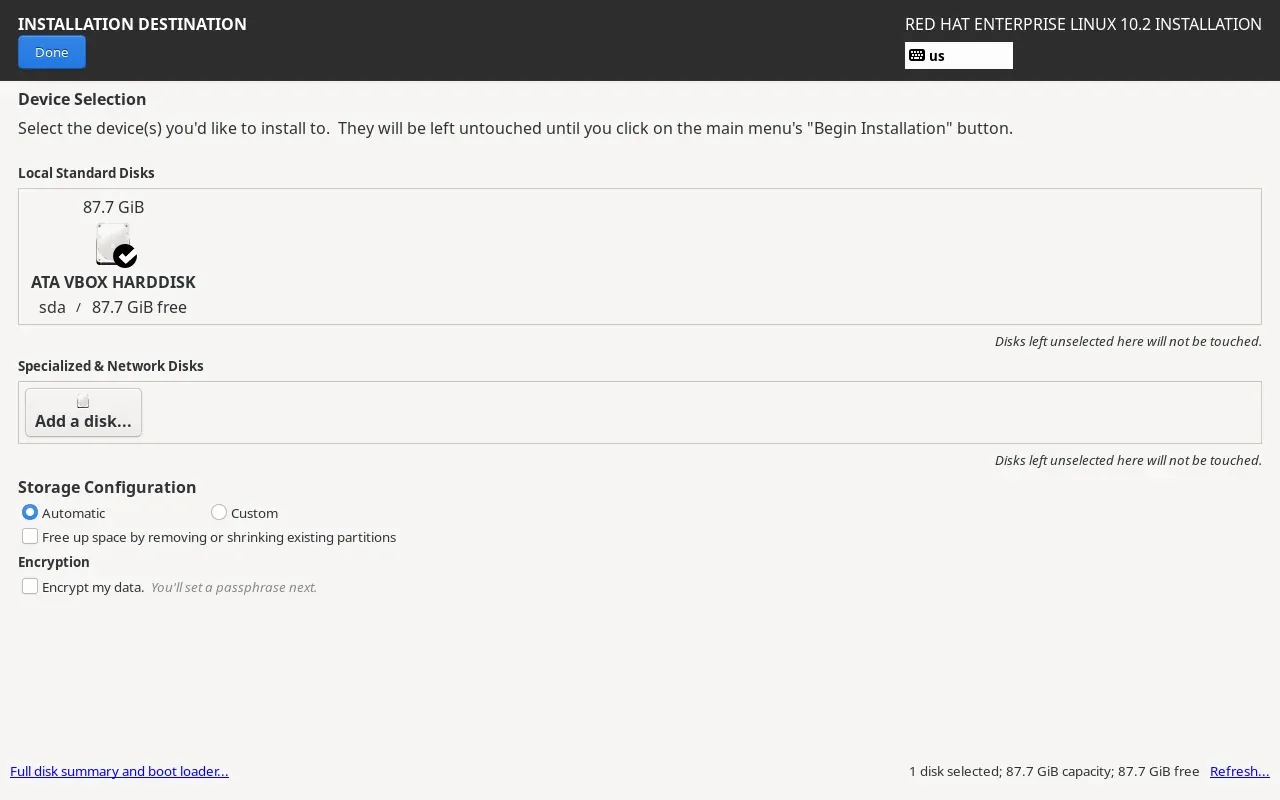
- Installation Destination. A single disk appears: our virtual disk, named “ATA VBOX HARDDISK” (87.7 GiB in my case), with a tick on it. On a real machine you may see several disks here; picking the right one is critical (see the Alternative: installing on a real machine section above). Leave Storage Configuration: Automatic. There’s also an Encrypt my data box at the bottom; remember the final note of part 1, on a real server we’d tick it. Leave it empty for now. Done. Anaconda will partition the disk itself; you’ll see what it did in a diagram shortly.
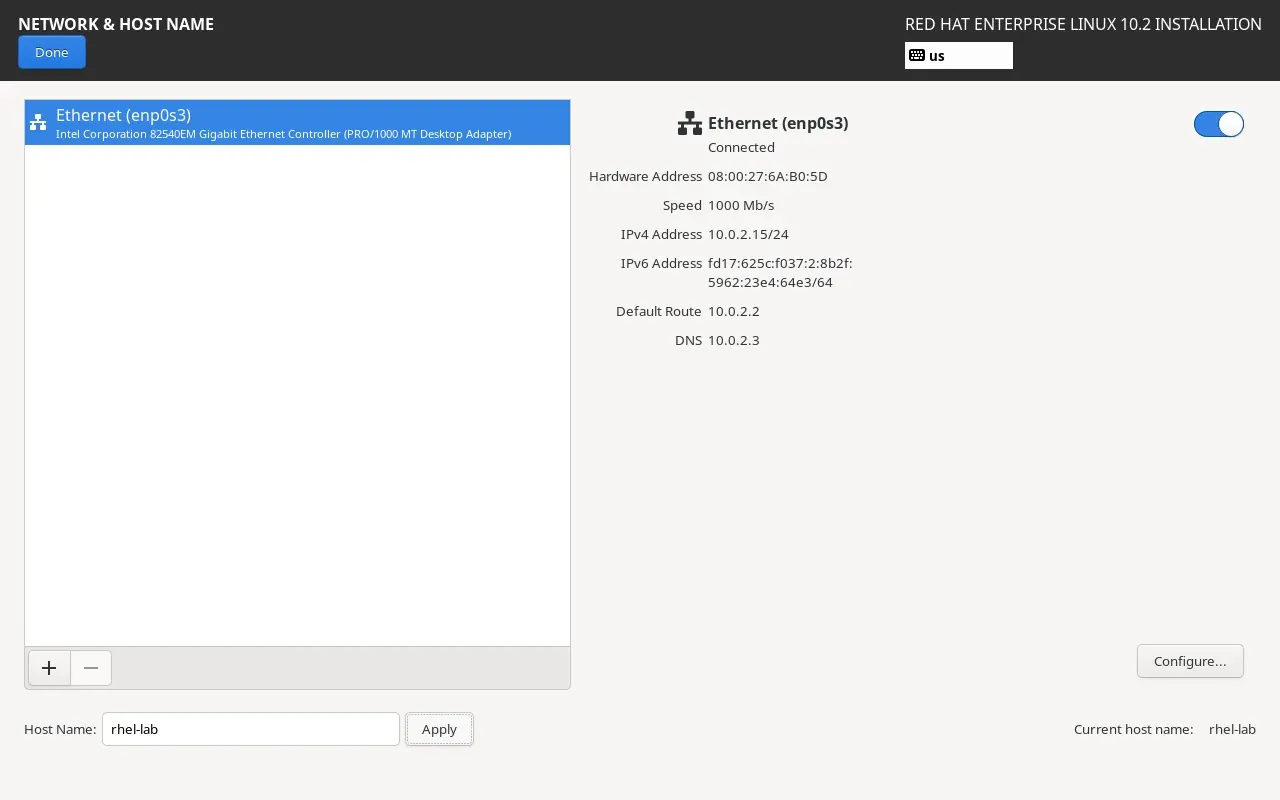
- Network & Host Name. The switch at the top right should be ON (in VirtualBox it usually comes on; the card is called
enp0s3); the network card uses the host’s internet and gets an IP address. In the Host Name box at the bottom typerhel-laband Apply; see “Current host name: rhel-lab” on the right. Done. - Root Account. RHEL 10 comes here with Disable root account selected, and my suggestion is to leave it that way: your user in the next step will carry the administrator rights. If you still want to enable root, choose Enable root account, type a strong password, and leave the Allow root SSH login with password box empty. Who root is, in a moment. Done. (On RHEL 9 this box is called Root Password and root comes enabled; there you’re asked to set a password.)
- User Creation. Type your Full name; the User name is derived automatically, change it if you like: lowercase, no special characters, no spaces (
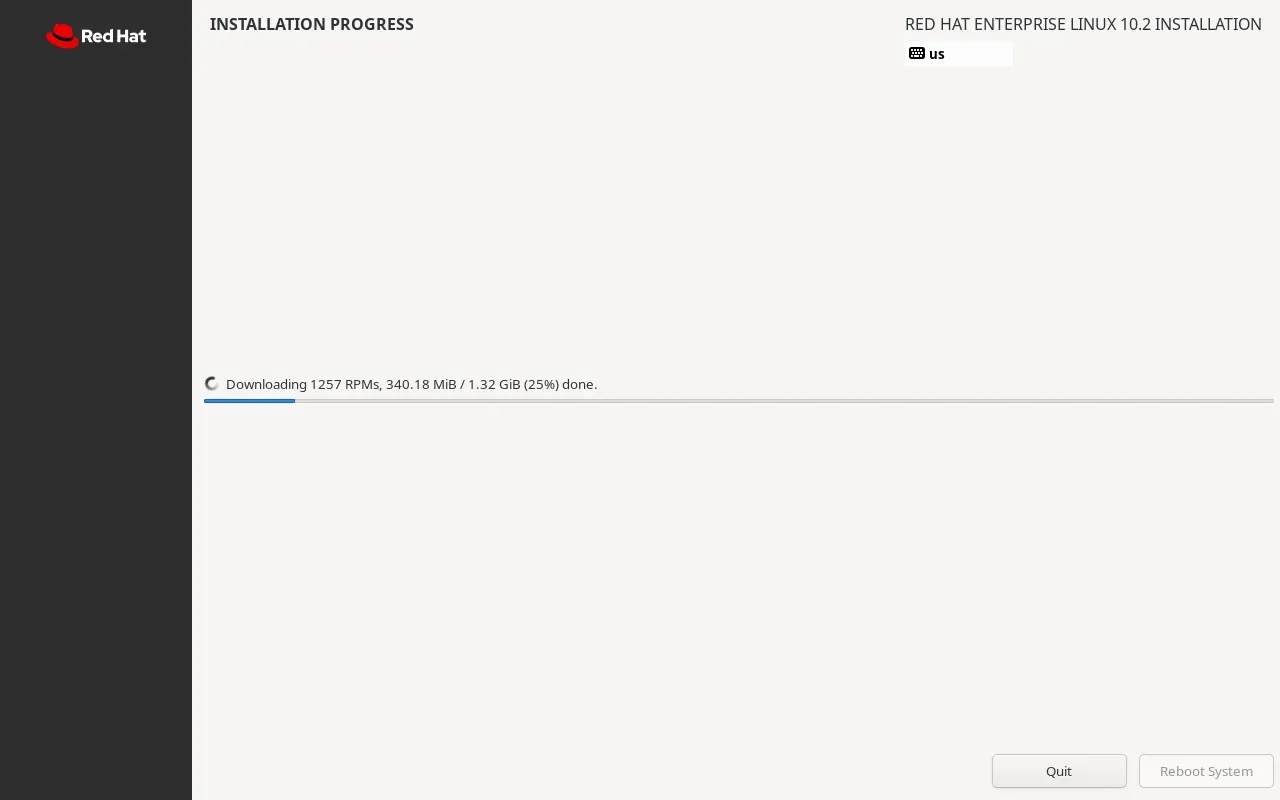
mehmet, for instance). The Add administrative privileges to this user account (wheel group membership) box comes ticked; leave it ticked, that’s where sudo comes from. Type the password twice; make it long enough for the bar underneath to say “Strong”. Done. - Begin Installation. Once the warning marks are gone, the button at the bottom right turns blue. Press it. With the Boot ISO the packages are downloaded first (1257 packages, 1.32 GiB in my case), then installed; with the DVD ISO they’re installed straight from the disc. The progress bar takes ten to twenty minutes; meanwhile read the two boxes below.
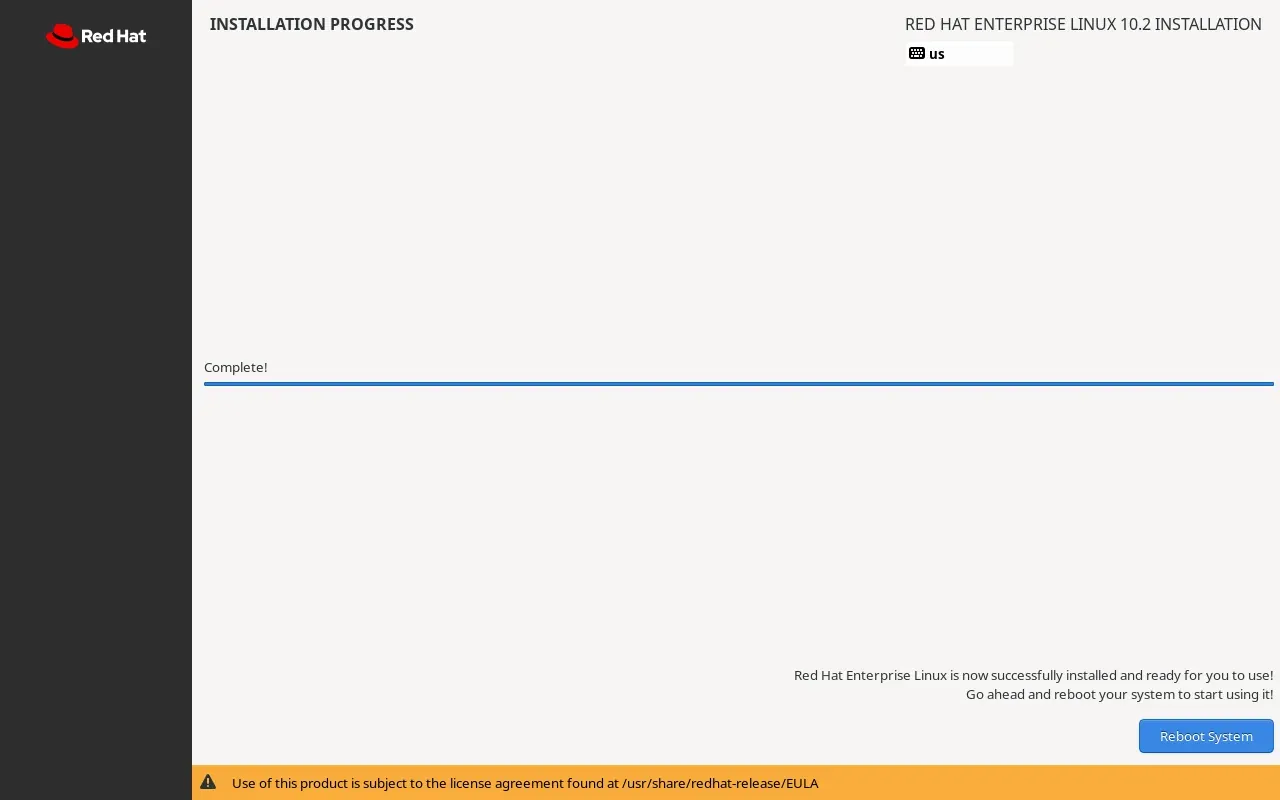
- Reboot System. When the installation finishes, the message “Red Hat Enterprise Linux is now successfully installed” and this button appear, with a note at the bottom saying where the licence agreement lives. Before pressing it, eject the ISO in VirtualBox with Devices → Optical Drives → Remove disk from virtual drive; otherwise the machine boots from the ISO and shows the installation menu again (exactly what happened in one of my early attempts). Then Reboot System.
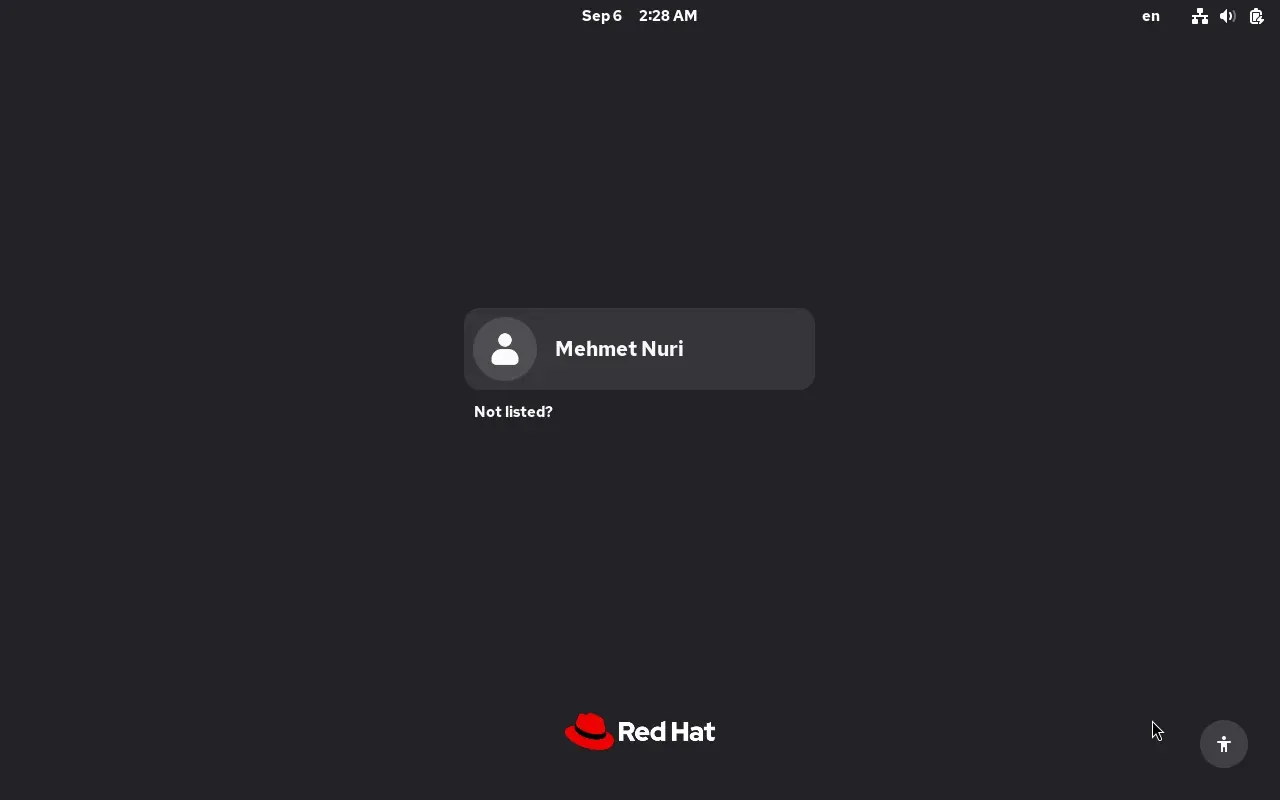
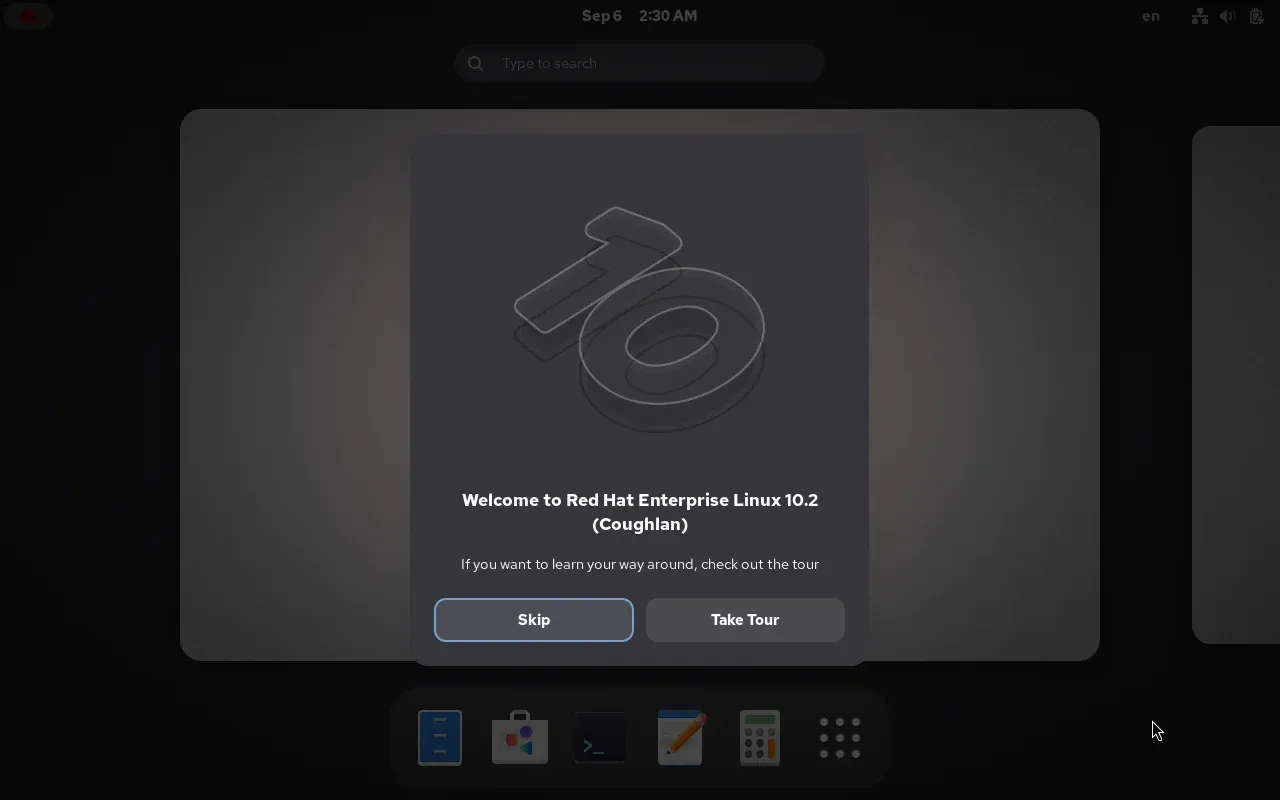
- First boot. On RHEL 10.2 no separate licence screen appeared; the licence counts as accepted with the note at the end of the installation (RHEL 9 shows an Initial Setup screen where you accept it and press Finish Configuration). You’re greeted by the login screen with the Red Hat logo: click your username, type your password. The GNOME desktop opens and offers a short tour, “Welcome to Red Hat Enterprise Linux 10.2 (Coughlan)”; Skip it if you like.
The screens
Let’s follow the steps once more in pictures; all of them are from my own RHEL 10.2 installation.
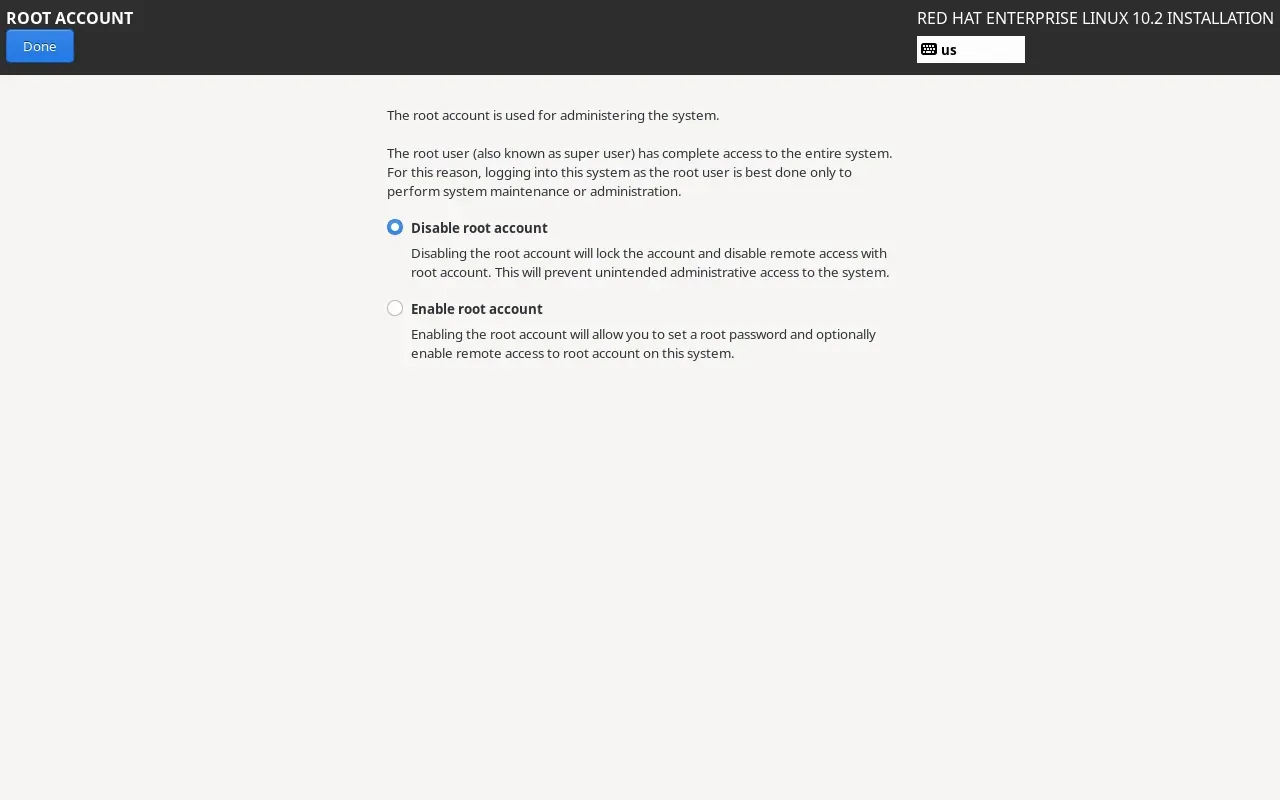
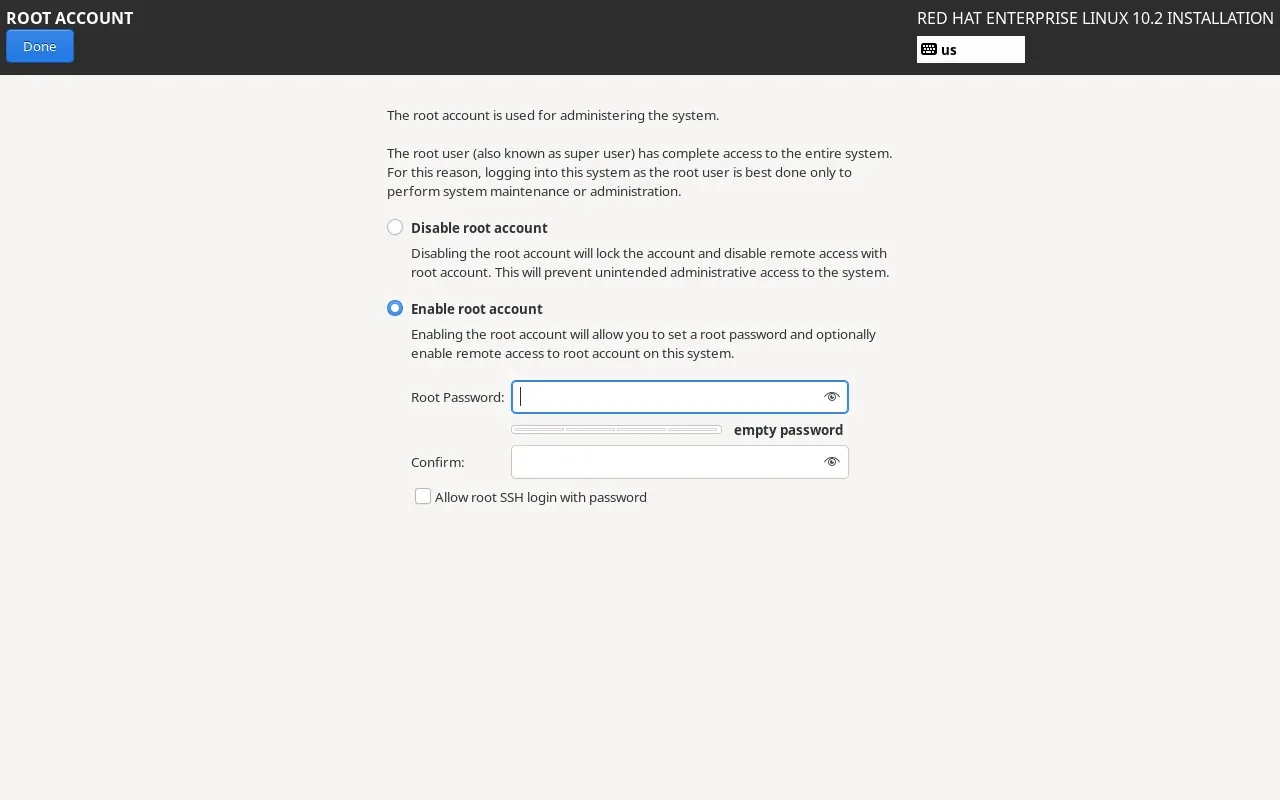
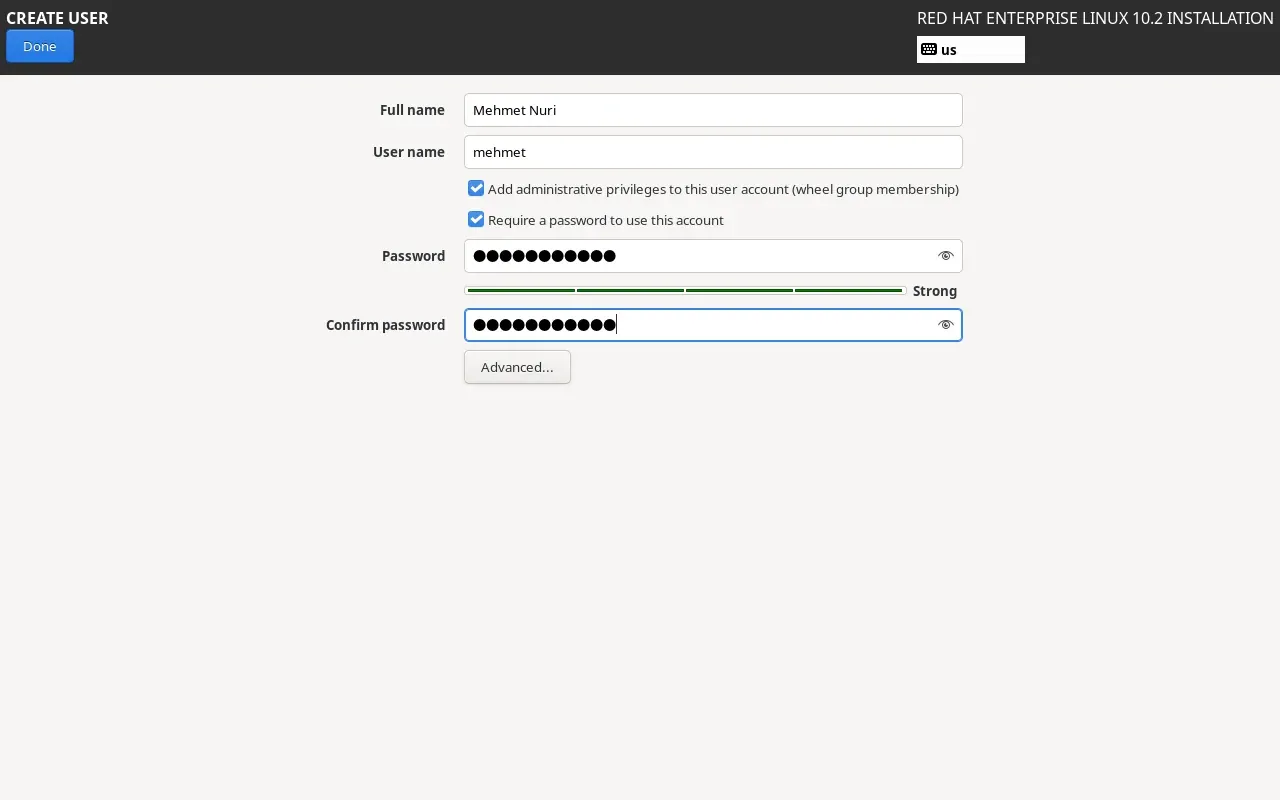
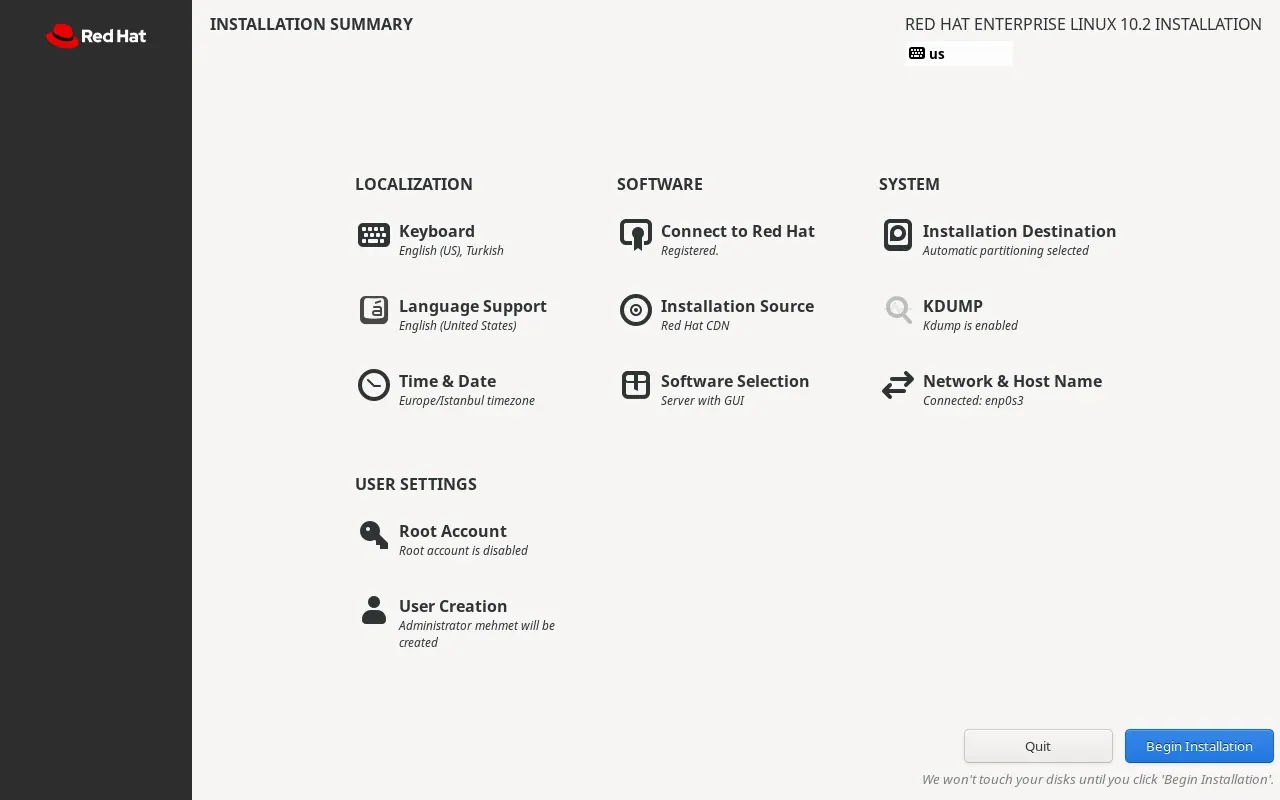
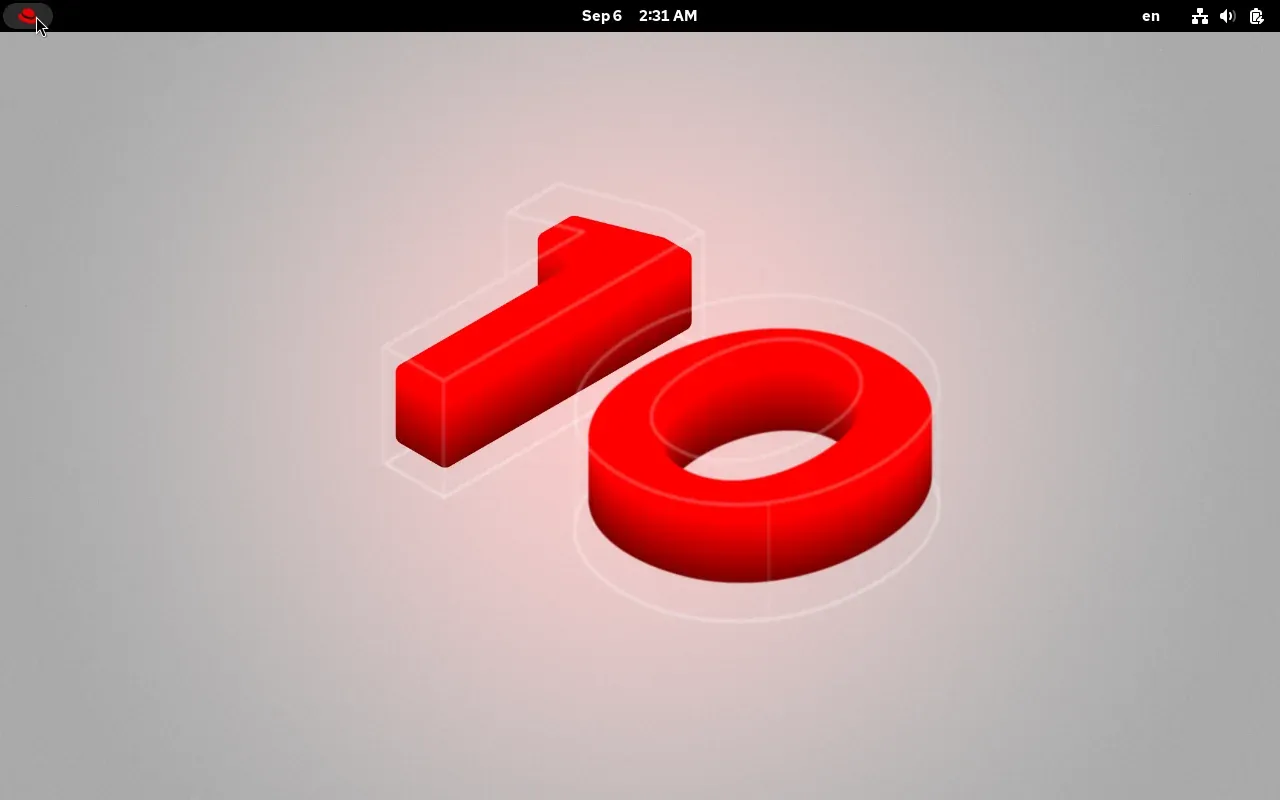
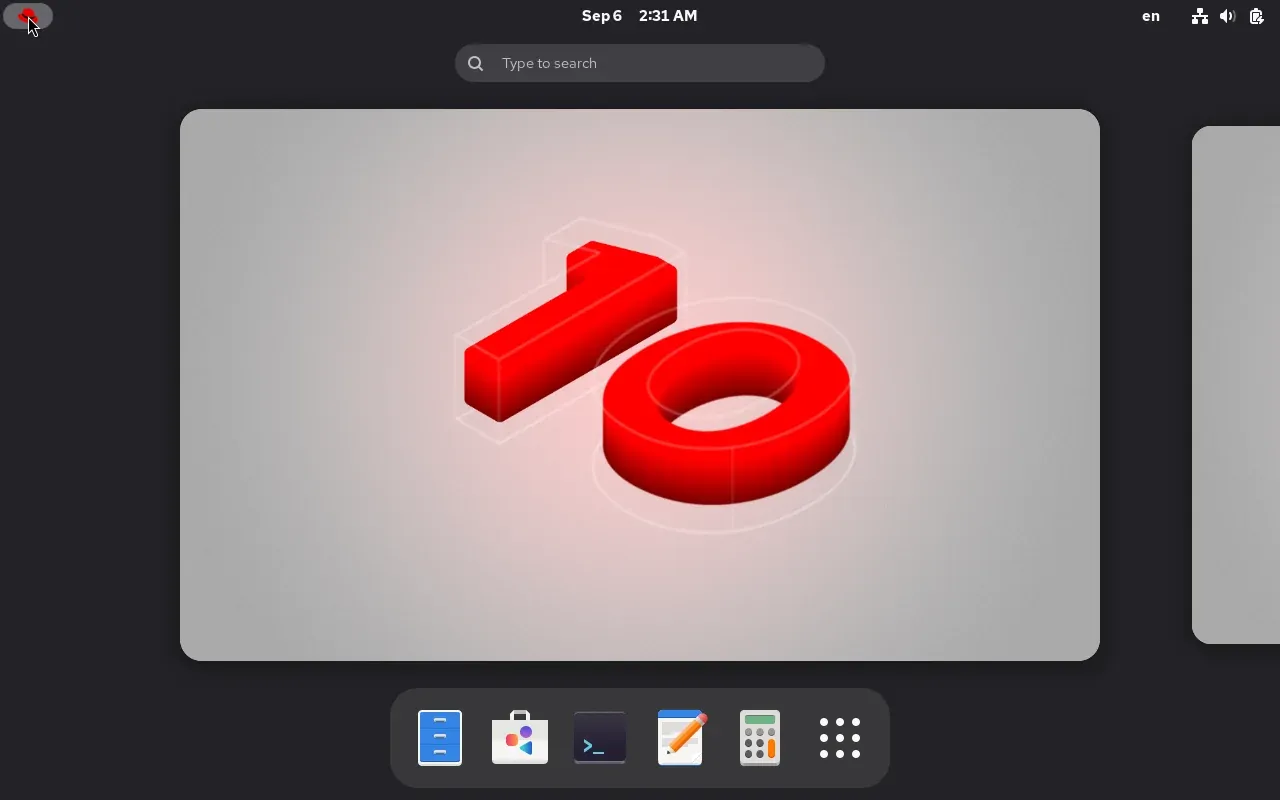
Congratulations, your first RHEL machine is running. But we’re not done; there’s registration and updating. First, let’s close the questions in the three boxes.
Behind the settings: language, keyboard, time
Every box on the installation screen turned into a few lines of configuration on the disk. From the terminal you can see what happened; let’s meet a few of them now, because they’ll be at your fingertips from part 3 onwards.
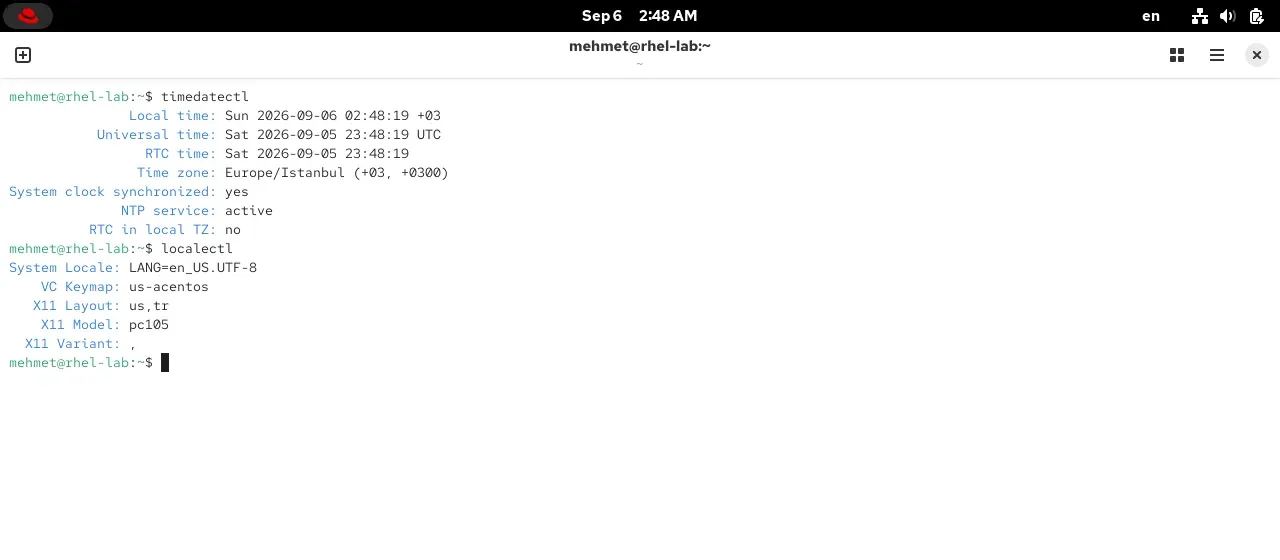
Language, technically the locale, is a three-part code: en_US.UTF-8 = language (English), region (US) and character encoding (UTF-8). Choosing “English (United States)” during installation means writing this line. The region part sets the date format, the decimal separator and the currency; UTF-8 is the encoding that can represent every alphabet in the world, Turkish letters included. So the system speaks English, yet “ş” and “ğ” are perfectly fine in file names. The keyboard is configured on two floors: a keymap for the text console (us) and layouts for the graphical session (us,tr). The en at the top right is the layout indicator of the second floor; Super+Space switches to Turkish and it reads tr.
On the time side there are two clocks. The motherboard’s battery-powered hardware clock (RTC) and the operating system’s system clock. Linux keeps the hardware clock in UTC (the “RTC in local TZ: no” in the output) and shows local time on screen by applying the time zone; +03 for Europe/Istanbul. Since Türkiye abolished daylight saving in 2016 and moved permanently to +03, that offset is constant year-round; the rules live in a package called tzdata and arrive with updates. The “Automatic date & time” option corrects the clock from time servers on the internet using the NTP protocol (Network Time Protocol, 1985); on RHEL a service called chrony does this. A correct clock on a server is not decoration: security certificates look at the date, log entries need ordering, and the scheduled jobs you’ll see in part 9 trust the minute. A machine whose clock is half an hour behind may fail to connect to websites with “certificate not yet valid”.
Registration and repositories: behind the scenes
What happens when you press Register in the “Connect to Red Hat” box is the concrete form of the subscription section from part 1:
flowchart TD
    A["Register: username and password"] --> B["subscription-manager talks to<br/>Red Hat's subscription service"]
    B --> C["The machine receives an identity certificate<br/>/etc/pki/consumer/"]
    C --> D["Content certificates are downloaded<br/>/etc/pki/entitlement/"]
    D --> E["A repository definition is written<br/>/etc/yum.repos.d/redhat.repo<br/>BaseOS and AppStream"]
    E --> F["dnf can now download packages<br/>from cdn.redhat.com"]
Your machine is given an identity certificate; from then on Red Hat recognises this machine by it (it uses one of the 16 systems on your account). Alongside it, content certificates are downloaded: digitally signed documents saying which repositories you may access. In the last step a repository file that dnf reads is written, and inside it are the two shelves you met in part 1: BaseOS and AppStream. These repositories are fed from Red Hat’s CDN (Content Delivery Network, cdn.redhat.com); the name appeared on screen as “Red Hat CDN”.
On older RHELs you also had to “attach” a subscription by hand after registering. Simple Content Access, the default since 2023, removed that: if the account is verified, the content is open. A sentence each on the other two options in the box: Set System Purpose reports the machine’s role, service level and usage (production, development) to Red Hat; companies use it for reporting, we don’t need it. Connect to Red Hat Insights installs a small agent on the machine (insights-client) that regularly sends system information to console.redhat.com; there Red Hat reports known vulnerabilities, misconfigurations and performance problems back to you. In company environments all of this registration is done with an activation key instead of a username; that’s the “Activation Key” option at the top of the box.
Software selection: environments and package groups
When you chose “Server with GUI” you actually chose an environment: a named bundle of package groups that make sense installed together. After installation you can see the list from the terminal:
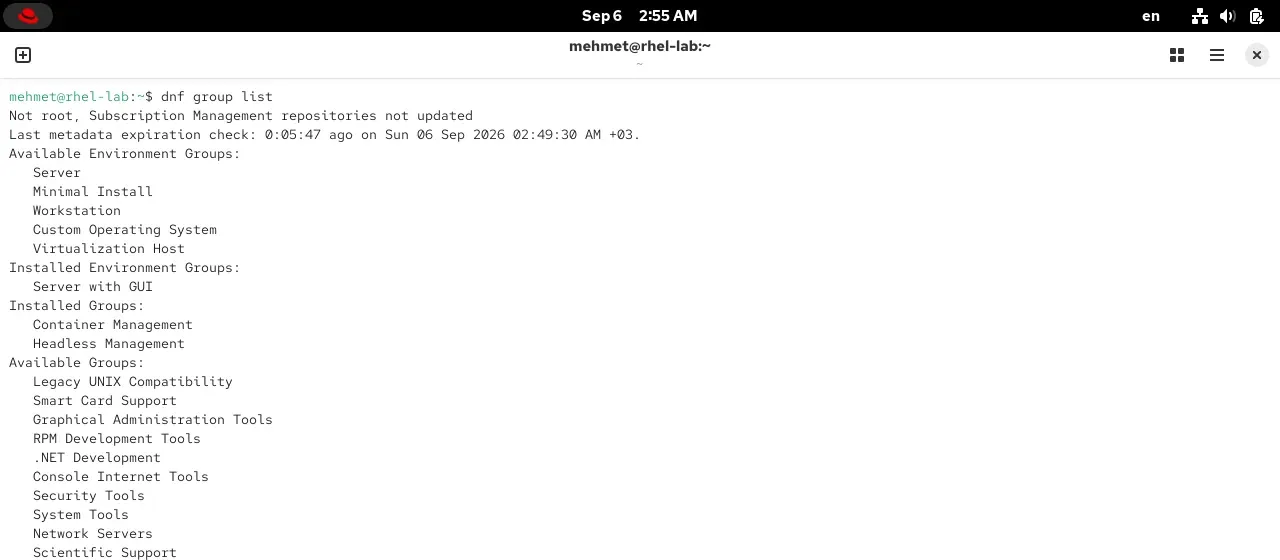
The list on the left of the installation screen appears here as “Environment Groups”, the add-ons on the right as “Groups”. Our choice shows up in the dnf history output as a single transaction: 1273 packages. A Minimal Install is a few hundred packages; the difference is the GNOME desktop, a browser, fonts and graphical tools. Adding an environment or group later is easy too: in part 7 we’ll do it with dnf group install. In the kickstart file this choice is a single line, @^graphical-server-environment; you’ll see it later.
Networking: enp0s3, 10.0.2.15 and NAT
The network connected without you clicking anything in the network box; how?
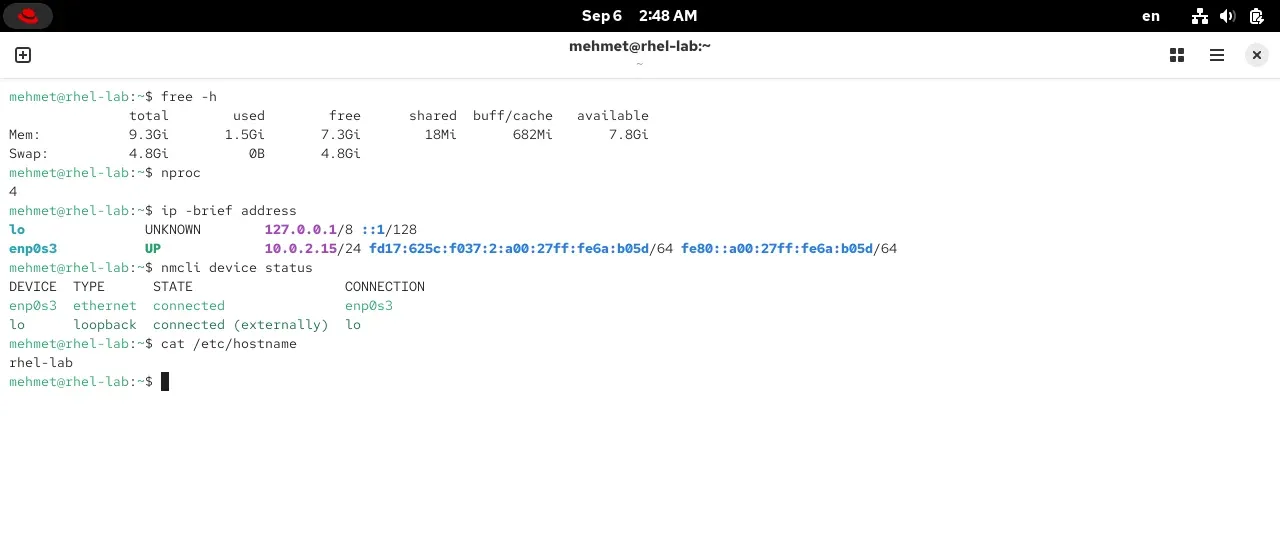
The card’s name enp0s3 is not random: en Ethernet, p0 PCI bus zero, s3 slot three. Older Linuxes called cards eth0, eth1; on a server with two cards, which one got zero could change from boot to boot, and that was a classic of faults fixed at three in the morning. Since 2012 the names are derived from the position in the hardware; a card in the same slot gets the same name at every boot.
The address 10.0.2.15 is not random either: it’s the standard address of VirtualBox’s NAT mode. NAT means this: the virtual machine lives in a small private network (10.0.2.0/24) hidden behind the host; when it wants to go out, the host sends the packets under its own name. The gateway is 10.0.2.2, the name server 10.0.2.3, and the DHCP server handing out the address is VirtualBox itself. The result: the virtual machine reaches the internet (which is why registration and package downloads went smoothly) but nothing from outside, not even the host, can connect directly to the virtual machine. In part 10, while learning remote access, you’ll hit this wall and we’ll see its two solutions: port forwarding and bridged mode. One more rule, for the host name: lowercase letters, digits and hyphens; no spaces, underscores or special characters. Add a domain to it (rhel-lab.home.local) and you get a fully qualified name; for now the short form is enough, and it lives in the file /etc/hostname.
How did Anaconda partition the disk?
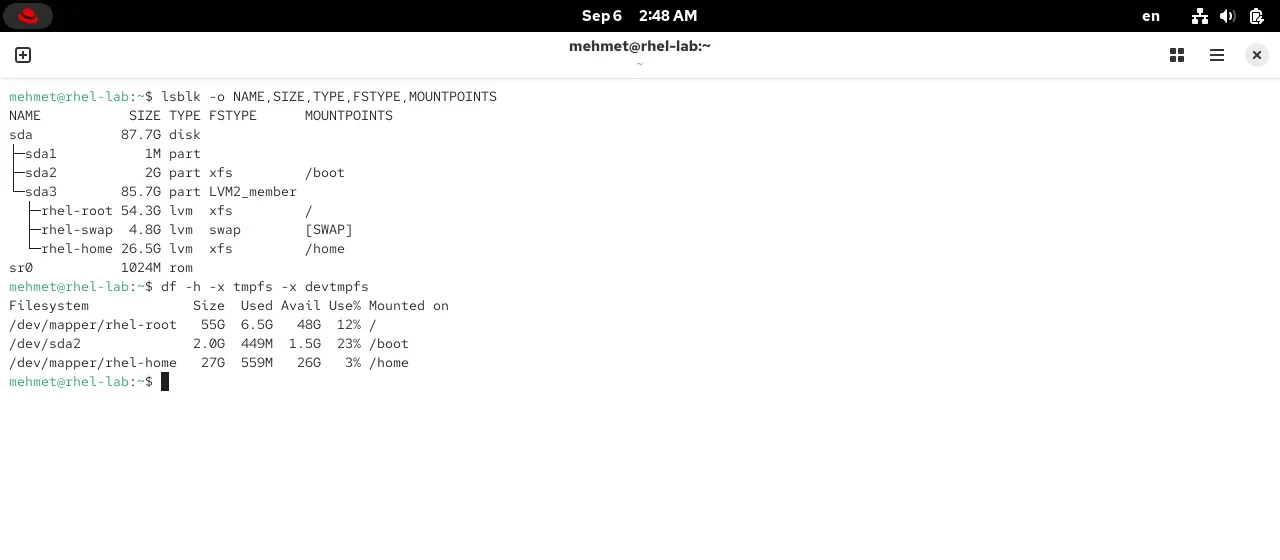
We said “Automatic” and Anaconda arranged the 87.7 GiB disk itself. Let’s look at what it did from the terminal; in part 11 we’ll do this by hand.
flowchart TD
    D["sda: 87.7 GiB virtual disk"] --> P1["sda1: 1 MiB, biosboot<br/>reserved space for GRUB's core"]
    D --> P2["sda2: 2 GiB, /boot (XFS)<br/>kernel and initrd files"]
    D --> P3["sda3: 85.7 GiB, LVM<br/>flexible partitioning layer; the volume group is named rhel"]
    P3 --> L1["rhel-root: 54.3 GiB, / (XFS)<br/>the entire system"]
    P3 --> L2["rhel-swap: 4.8 GiB<br/>backup space on disk when memory runs out"]
    P3 --> L3["rhel-home: 26.5 GiB, /home (XFS)<br/>the users' files"]
Piece by piece: sda1 is a tiny partition; because the virtual machine boots with an old-style BIOS, a piece of GRUB needs a place to live, that’s all (on a machine booting with UEFI there would be a 600 MiB /boot/efi partition instead). sda2 is /boot: the kernel and initrd live here; the first links of the boot chain from part 1. RHEL 10 gives it 2 GiB so that several kernel versions can sit side by side. Everything else is in sda3, and not directly as partitions but inside a layer called LVM. LVM is the flexible arrangement that lets you grow and shrink partitions later, even add a second disk and move a partition onto it; Anaconda named the volume group rhel and opened three logical volumes in it. Root (/) is the whole system; swap is disk space the kernel uses temporarily when memory fills up, sized according to memory (4.8 GiB for 10 GiB of memory); home holds the users’ files. Anaconda separates /home when the disk is larger than 50 GiB, so that your files survive even if you reinstall the system; on a 30 GB disk this partition doesn’t exist and everything stays in root.
Everywhere you see XFS as the file system: written in the 1990s by Silicon Graphics for large files, the default since RHEL 7. Remember from the table in part 1 that Ubuntu uses ext4; that was one of the family differences. Had we ticked “Encrypt my data”, this whole arrangement would be built inside a LUKS encryption layer and the machine would ask for a passphrase at every boot; that was the disk encryption from the final note of part 1. The only thing you need to know for now: “everything is under /”, and we’ll open that sentence up at length in part 4.
Who is root, and what is sudo?
You created two accounts during installation, and now you need to know which one to use when. root is the single account in Linux that can do everything: change system files, install packages, delete users, format the disk. Powerful and dangerous; one typo can wipe the whole system. That’s why you do daily work as your own user and borrow root’s powers only when needed, for a single command. The borrowing command is called sudo (“superuser do”). When you left the “Add administrative privileges” box ticked during installation, your user joined a group called wheel; sudo grants its powers to members of that group. That’s also why RHEL 10 ships with the root account disabled: you don’t need root for administrator rights, the wheel group and sudo are enough.
flowchart TD
    C["You typed a command"] --> Q{"Does it start with sudo?"}
    Q -->|"No"| N["Runs as your own user<br/>can't touch system files"]
    Q -->|"Yes"| P["sudo asks for your password<br/>(your own, not root's)"]
    P --> W{"Are you in the wheel group?"}
    W -->|"No"| R["Refused; the event is logged"]
    W -->|"Yes"| OK["The command runs with root's powers,<br/>then the powers are handed back"]
Note two details in the diagram: sudo asks for your own password, not root’s; and every use of sudo is logged, so it’s clear who did what and when. In a real company nobody uses the root password day to day; everyone logs in with their own account and says sudo when needed. The “is it allowed?” question in the system call diagram from part 1 is answered by looking at exactly these accounts. In part 6 we’ll learn users, groups and permissions from start to finish.
How does the user you created during installation look from the terminal?
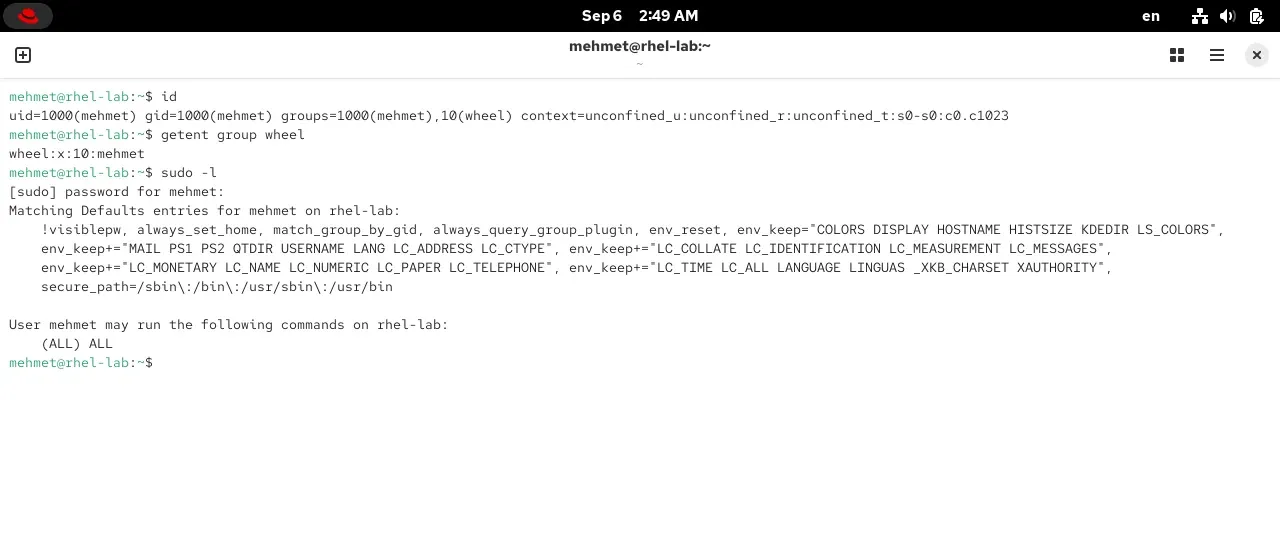
Linux knows people by their numbers, not their names. The uid=1000 in the id output is your user number; root’s number is 0, and 1 to 999 are reserved for the system’s own accounts (for services); the first real human starts at 1000. gid=1000 is your personal group, created under your name. Next to it is wheel (10): the “administrative privileges” box during installation put you in this group. The name comes from 1970s BSD Unix; in English a “big wheel” is a big boss. Sudo’s rules live in the file /etc/sudoers, and on RHEL a single line does the whole job: %wheel ALL=(ALL) ALL, meaning “members of wheel may run every command, as every user, on every machine”. The (ALL) ALL in the sudo -l output is the reflection of that line. The long “Defaults” section at the start of the output is interesting too: sudo resets environment variables and pins the search path to a safe list while running a command; precautions against a malicious program tricking sudo. And there’s the context=unconfined_u... part: that’s the label SELinux stuck on you; the subject of part 12, ignore it for now.
The “Strong” bar under the password box is a program’s work too: libpwquality scores the password by length, variety of characters and dictionary words; Anaconda won’t accept one that is too short or guessable. Your home folder is /home/mehmet, your shell /bin/bash; we’ll enter both in part 3.
What did Anaconda do during the installation?
In the fifteen minutes between pressing Begin Installation and Reboot System, this sequence of work ran behind the scenes:
flowchart TD
    A["Partition and format the disk<br/>(GPT table, LVM, XFS, swap)"] --> B["Download and install the packages<br/>1273 packages, with dnf"]
    B --> C["Write the bootloader<br/>GRUB 2 to the disk, boot entries to /boot"]
    C --> D["Generate the initial RAM disk<br/>(dracut, initramfs)"]
    D --> E["Apply SELinux labels,<br/>write the user and password, register the machine"]
    E --> F["Write your choices to the kickstart file<br/>/root/anaconda-ks.cfg"]
    F --> G(["Reboot System"])
You’ll do most of these by hand in later parts of the series: partitioning in part 11, packages in part 7, the bootloader in part 8, SELinux in part 12. For now let’s look only at the last step, because it is very instructive:
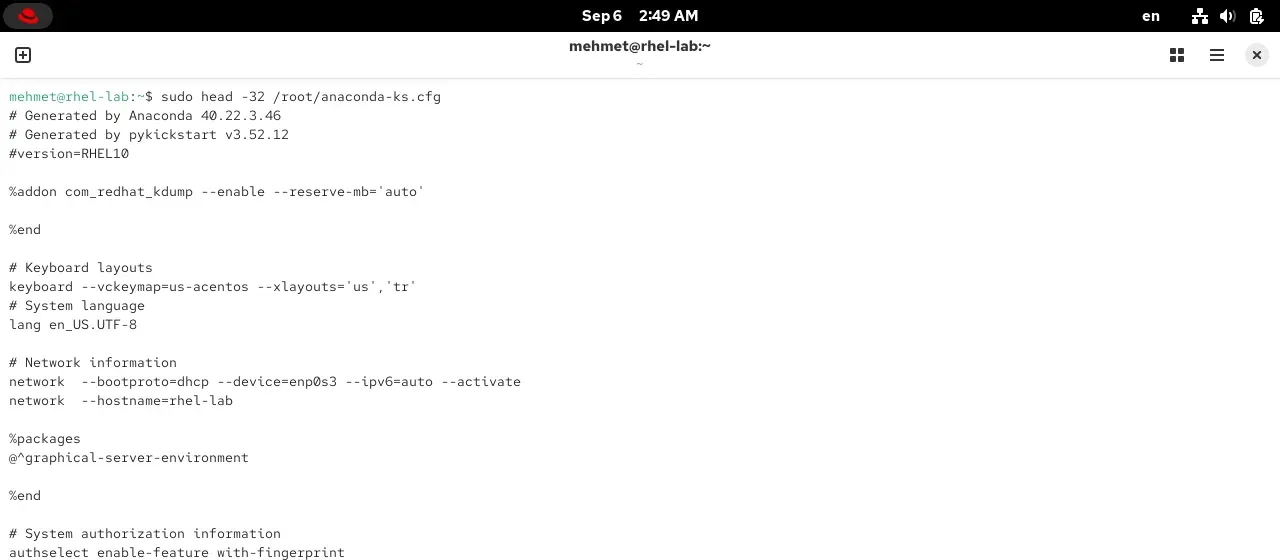
This is the recipe of the installation. keyboard --xlayouts='us','tr' is the keyboard box; lang en_US.UTF-8 the language screen; network --hostname=rhel-lab the network box; @^graphical-server-environment the software selection; autopart the “Automatic” in the disk box. Like the pseudocode we wrote in the Algorithms series: every step of the installation in one line. Put this file on a USB stick and start a new machine with “install according to this file”, and Anaconda does the same installation without asking a single question; that’s how two hundred servers are installed identically. The version numbers at the top of the file say something too: Anaconda 40, pykickstart 3.52, Blivet 3.13 (the library that does the disk work). The concrete form of the sentence “everything is open source” from part 1: even the installer’s components have a name, a version and a repository.
Step 5: checking the registration and the first update
Now our first terminal commands. On the desktop click Activities at the top left, then the terminal icon in the dock at the bottom (or type terminal and press Enter). In the window that opens you’ll see this line (with your own username and machine name if they differ):
mehmet@rhel-lab:~$This line is called the prompt and it tells you four things: your username, the machine name (the rhel-lab we gave during installation), the folder you’re in (~ is your home folder) and the $ sign (it would be # if you were root). In part 3 we’ll take this line apart piece by piece; for now just type the commands below and press Enter.
If you registered with Connect to Red Hat during installation, the machine is already linked to your Red Hat account and the repositories are open. Remember the repository concept from part 1: the shelves, the catalogue, and your account as the key to the door. Let’s check:
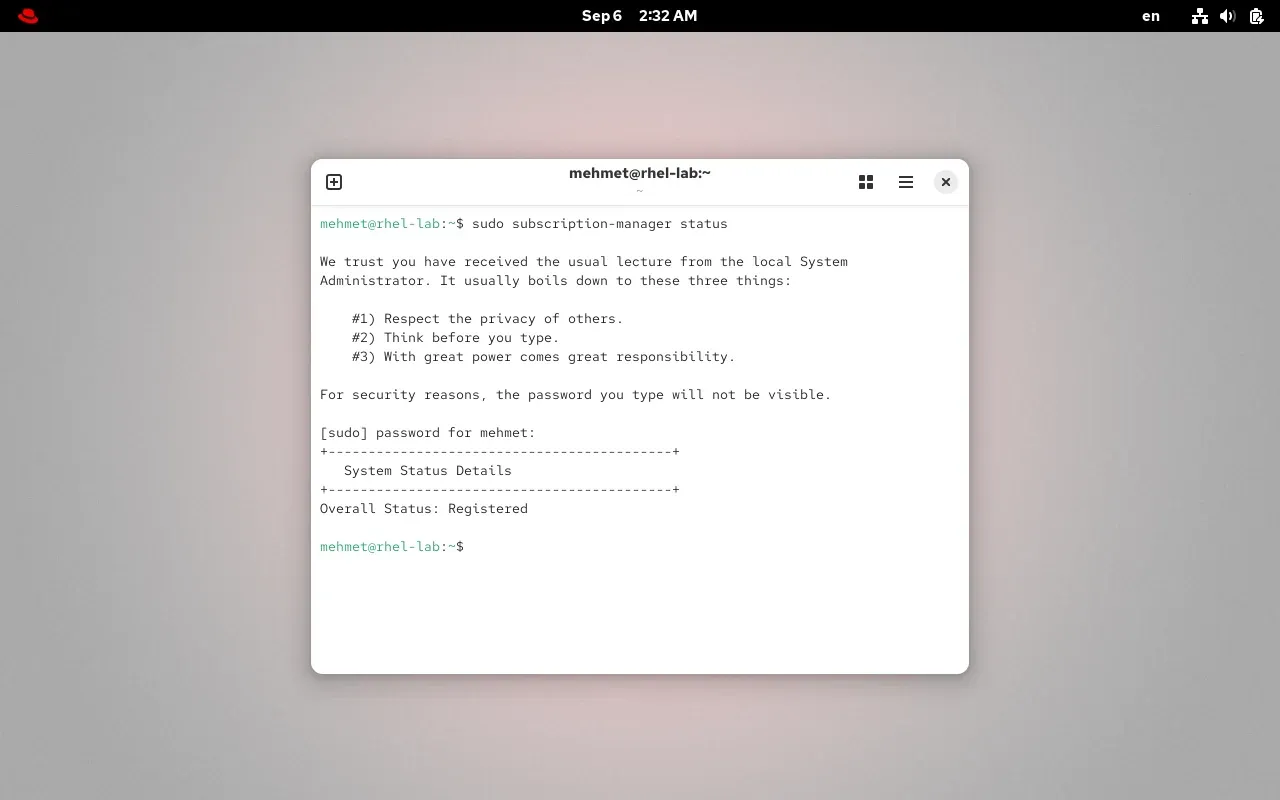
sudo subscription-manager statussudo asks for your password (your own). Since it’s your first time using sudo, you also get to read that famous lecture: “Respect the privacy of others, think before you type, with great power comes great responsibility.” Then a short table appears with the line Overall Status: Registered. That’s it; the machine is registered.
If you installed from the DVD ISO and skipped registration, you do the same job from the terminal now:
sudo subscription-manager registerThe command asks for your Red Hat username and password; the password is invisible as you type, which is normal. A few seconds later the message “The system has been registered” appears and the repositories open. On RHEL 9 and 10 there is no separate subscription to “attach” as there used to be; once the account is verified, you’re done. Let’s see what happened in a diagram:
flowchart TD
    A["Registration: Connect to Red Hat in the installer<br/>or sudo subscription-manager register"] --> B["Connects to Red Hat's server,<br/>verifies your account and subscription"]
    B --> C["The machine is registered to your account,<br/>the BaseOS and AppStream repositories open"]
    C --> D["sudo dnf update -y"]
    D --> E["Download the repository catalogues,<br/>compare with the installed packages"]
    E --> F{"Any package left<br/>with a newer version?"}
    F -->|"Yes"| G["Download, verify the signature, install"]
    G --> F
    F -->|"No"| H["sudo reboot"]
    H --> I(["An updated, registered RHEL"])
Now the first update. The packages inside the ISO (or downloaded during installation) belong to the day of the installation; the security patches and fixes released since then are waiting in the repository. The sibling of the dnf install loop I described in part 1:
sudo dnf update -y-y (“yes”) answers dnf’s “this is the list of what will be installed, do you confirm?” question in advance. If you want to see the list, run it without -y, read, then type y. The first update may be a few hundred packages and takes five to fifteen minutes depending on your internet speed. When it finishes, reboot so that the new kernel and libraries take effect:
sudo rebootFor me the first update ended like this:
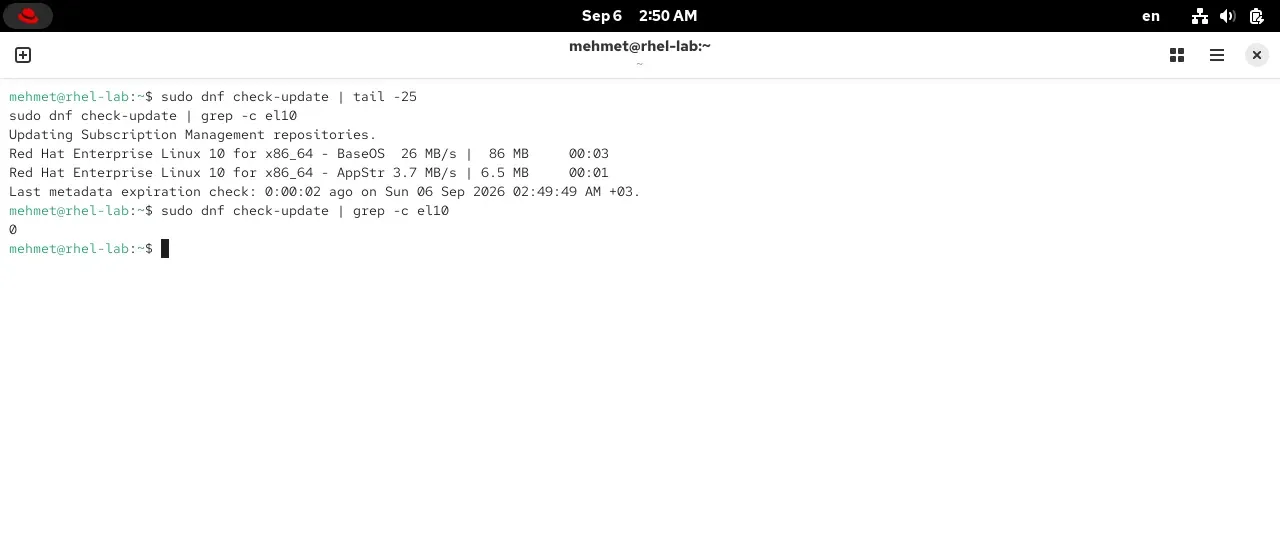
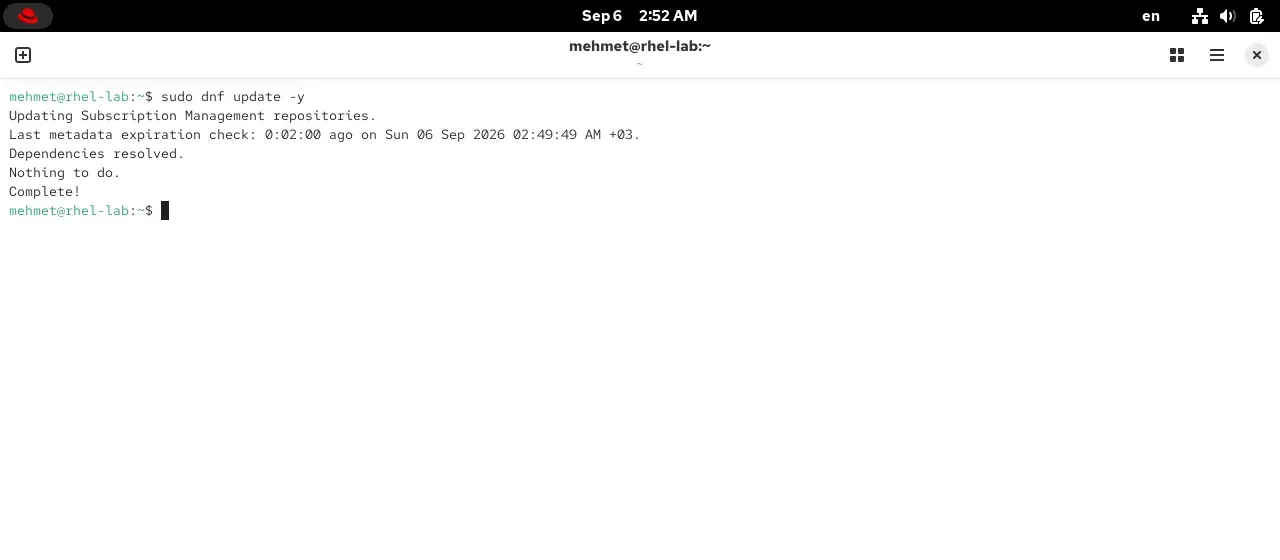
Don’t be surprised: since we installed from the Boot ISO, the packages came down from Red Hat’s repository in their current form barely an hour ago, hence “Nothing to do”. Had you installed from the DVD ISO you’d see a few hundred packages here. The first line of the output, Updating Subscription Management repositories, appears on every dnf command: before dnf runs, the subscription-manager plugin checks that the repository list is current. The second line, metadata expiration, says when the repository catalogue was last downloaded; dnf doesn’t refresh the catalogue every time, only when it has gone stale.
The first package installation
The update came up empty, but this is the perfect moment to see the package loop I described in part 1 with a real installation. I picked a small, useful program: tmux, a tool that splits the terminal into panes (we’ll use it a lot later).
sudo dnf install -y tmux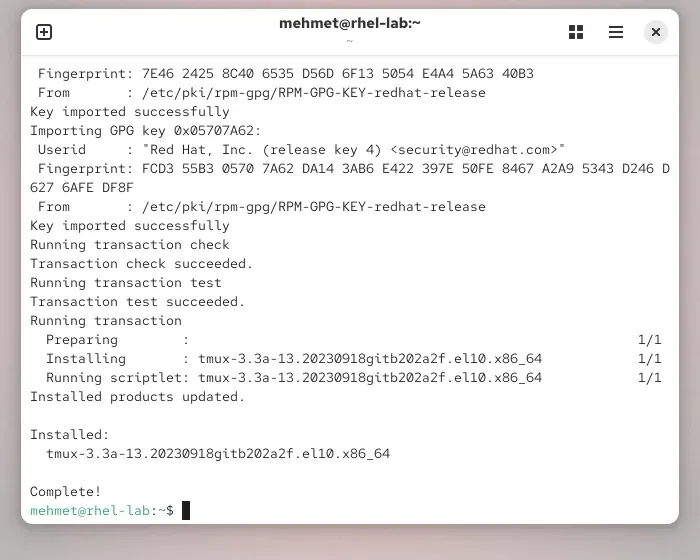
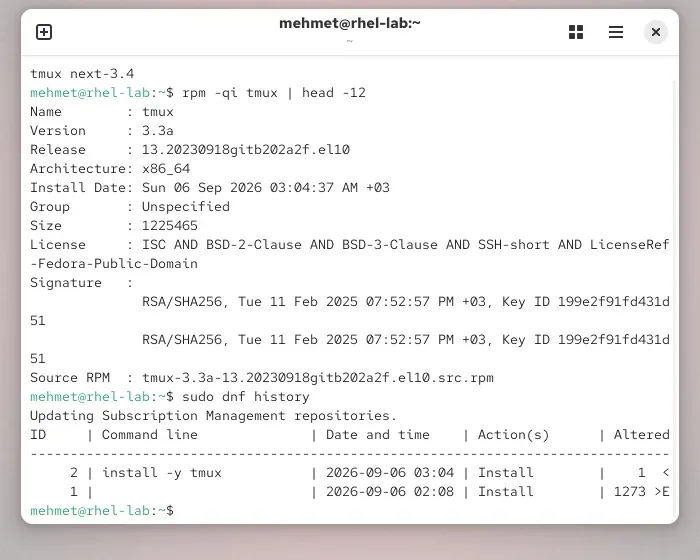
All the concepts of part 1 pass by in order in the output. First dnf imports the signing keys: the keys used to verify that packages really come from Red Hat, from the folder /etc/pki/rpm-gpg/ (that hologram sticker). Then transaction check and transaction test: dnf first does a dry run of the installation and only performs it for real if there are no conflicts. At the end the line tmux-3.3a-13...el10.x86_64: the package-name reading exercise from part 1, el10 = packaged for RHEL 10. Looking at the package’s record with rpm -qi tmux, you see that signature in the Signature line; sudo dnf history keeps every package operation on the machine numbered, and if you like, dnf history undo 2 takes the tmux installation back. The rest of the package world is in part 7.
A quick look around
After the reboot, open the terminal again. Don’t memorise these; just type them and look. Each one will come up one by one from part 3 onwards.
cat /etc/os-release # which RHEL release?uname -r # kernel version (starts with 6.12, ends in el10)hostnamectl # machine name and hardware summaryfree -h # memory: total, used, freedf -h / # how much space is left on the root partition?ip -brief address # network card and IP address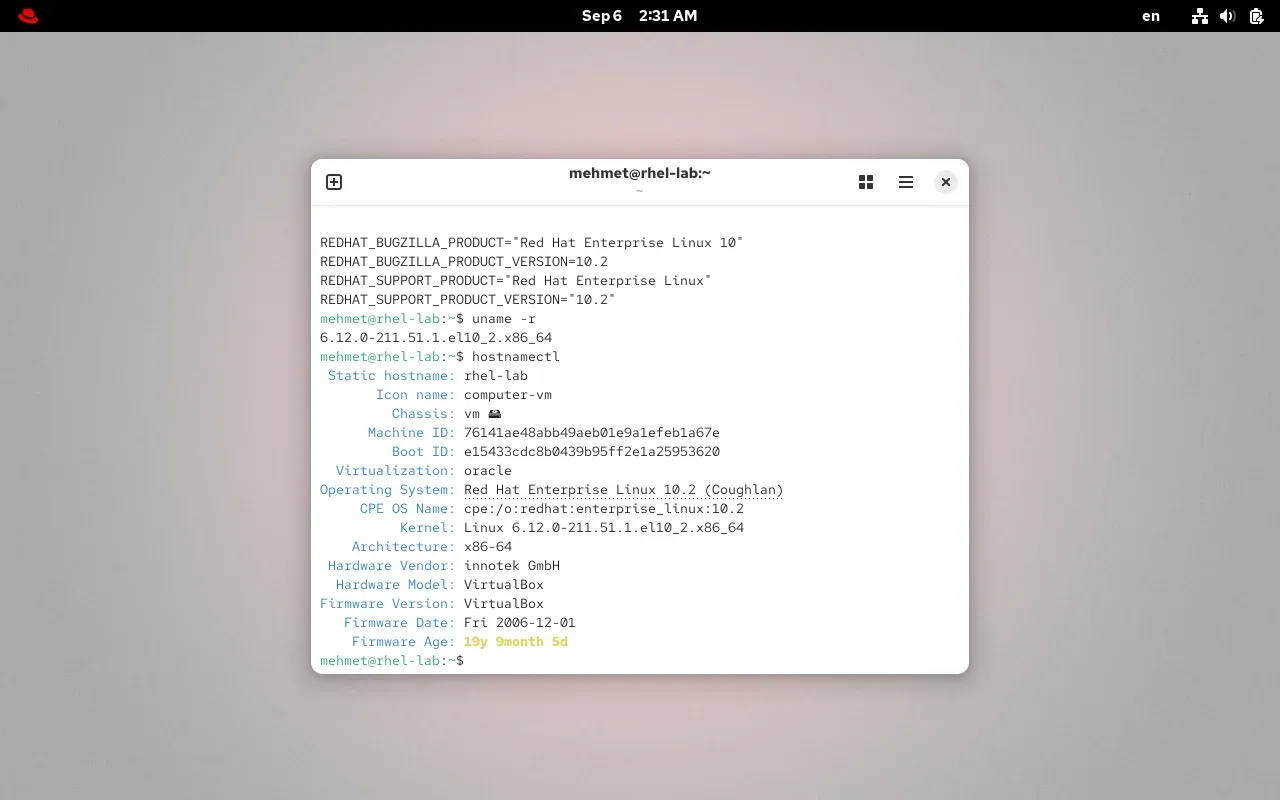
In the output of the first command look for Red Hat Enterprise Linux 10, in the second the kernel number starting with 6.12. In part 1 I said “RHEL 10’s kernel is 6.12”; here it is with your own eyes. In free -h you’ll see the memory you gave the virtual machine, in df -h / the space Anaconda allotted to the root partition.
How to read a kernel version number
For me uname -r said 6.12.0-211.51.1.el10_2.x86_64. Every piece of this long string says something, and the proof of the backporting discussion from part 1 is right here:
| Piece | Meaning |
|---|---|
6.12.0 | The upstream kernel version; the 6.12 that Torvalds’ team released at the end of 2024 |
211 | How many times Red Hat has packaged this kernel: 211 builds, each carrying patches and fixes |
51.1 | The update number within RHEL 10.2 (the z-stream): security patches to the same kernel are counted here |
el10_2 | For Enterprise Linux 10.2 |
x86_64 | The processor architecture |
So “RHEL 10 has kernel 6.12” means “Torvalds’ 2024 kernel, with the fixes Red Hat has worked in over 211 rounds”. The version number looks old, the code inside it doesn’t; that “old-looking versions” section again. rpm -q kernel lists the installed kernel packages; as updates arrive, several versions sit side by side here (RHEL keeps three) and you can fall back to an older one from the boot menu. That’s why /boot is 2 GiB.
The hostnamectl output tells a few things as well: Chassis: vm and Virtualization: oracle show that the kernel knows it’s a virtual machine running in VirtualBox. The line Hardware Vendor: innotek GmbH is a small history lesson: VirtualBox was written in 2007 by a German company called innotek, bought by Sun Microsystems in 2008 (the company where Java was born, from part 1), and passed to Oracle together with Sun in 2010. The virtual machine’s BIOS still carries innotek’s name.
Everything under /: a small preview
In part 1 I said “everything is under /”. The tree command that came with the installation shows it at a glance:
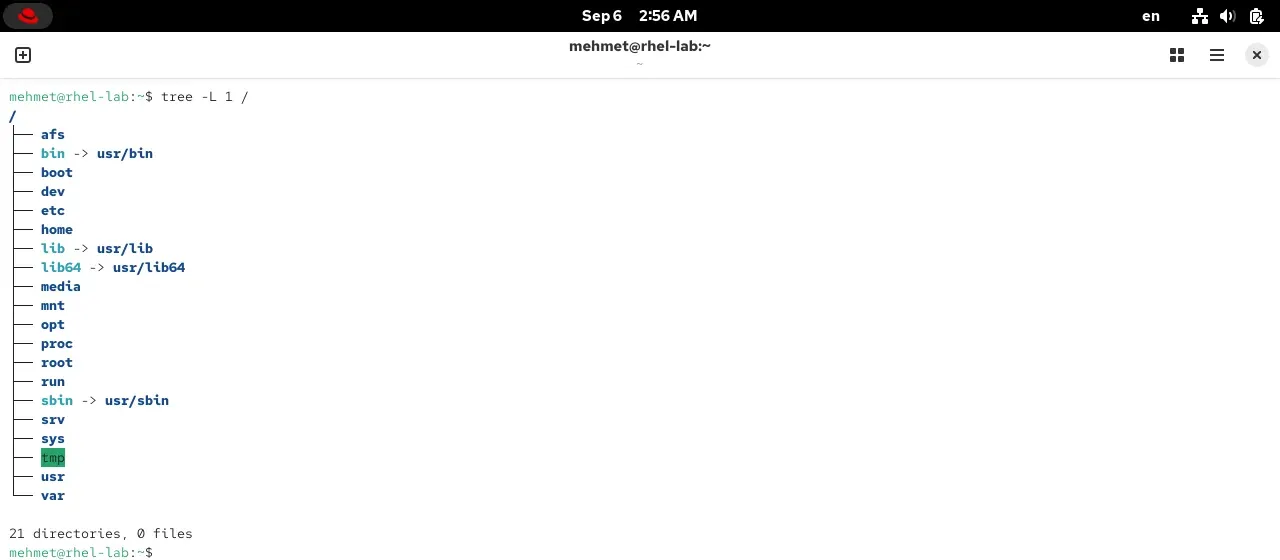
Twenty-one folders, each with a job: /etc configuration files (the /etc/hostname from earlier was there), /home the users’ homes, /var logs and changing data, /boot the kernel, /dev devices, /proc and /sys the kernel’s live state. Arrows like bin -> usr/bin are shortcuts: since 2012 the actual programs are gathered under /usr, and the old names remain for compatibility. We’ll walk through all of them in part 4.
Snapshot: insurance before you break things
The last job, perhaps the most important one. Shut the virtual machine down (sudo poweroff or from the desktop), then in VirtualBox with rhel-lab selected do Machine → Take Snapshot, and name it clean install. In UTM right-click Snapshots; in Boxes the Snapshots tab in the machine’s properties.
A snapshot is a photograph of the disk and settings at that moment. Later in the series, when you mistype a command and leave the system unbootable (you will, we all have), you say Restore and return to this moment; no reinstallation. That’s why from now on you can experiment on this machine without fear. In fact you should: half of the learning in this series will come from breaking something and understanding why it broke.
If something goes wrong
- “VT-x/AMD-V is not available”, or the virtual machine crawls. Virtualisation is disabled in the BIOS/UEFI; see the traps box above. On Windows, also check whether Hyper-V is enabled.
- Software Selection is grey and says “Red Hat CDN requires registration”. You’re using the Boot ISO; register with your account in the Connect to Red Hat box first, and the box unlocks.
- The installation stops at the first screen with a message like “CPU not supported”. RHEL 10’s processor requirement; download the RHEL 9 ISO.
- The installer doesn’t start, black screen. Increase the memory you gave the virtual machine (at least 2048 MB); in the boot menu try Troubleshooting → Install in basic graphics mode.
- The window is too small, the desktop doesn’t fit. In VirtualBox View → Auto-resize Guest Display or scaled mode; Boxes and UTM fit the window themselves.
- Registration says “Invalid username or password”. Make sure you’ve logged in to developers.redhat.com in a browser and accepted the terms; if your password contains unusual characters, try changing it.
- I can’t download the ISO or create an account. Download the AlmaLinux or Rocky Linux ISO; the installation screens are identical, there’s just no registration step, go straight to
sudo dnf update -y. Remember the family tree from part 1: the same car, unbadged.
Think for yourself
The installation is done, but let a few questions stay on paper; let’s make sure the concepts have settled.
Question 1 — The right ISO (easy)
A friend has a MacBook with an M3 processor, has downloaded RHEL’s x86_64 ISO and is trying to install VirtualBox. What do you tell them?
Question 2 — Memory bargaining (easy)
Your computer has 8 GB of memory. What happens if you give the virtual machine 6 GB? And 1 GB?
Question 3 — With root disabled (medium)
RHEL 10 shipped with the root account disabled and we left it that way. Can we still administer the system? When would enabling root be necessary?
Question 4 — The bank server (medium)
You’re installing RHEL on a bank’s database server. Which environment do you pick in Software Selection, and why?
Question 5 — Snapshot timing (easy)
Does it make more sense to take the snapshot before the update or after? Why?
Question 6 — Read the version number (medium)
On a friend’s machine
uname -rgives5.14.0-503.11.1.el9_5.x86_64. Which RHEL release is it, which upstream kernel, and which Red Hat build?
Question 7 — The NAT wall (medium)
Your virtual machine reaches the internet, but when you try to connect to
10.0.2.15from your host computer you get no answer. Why? Did you do something wrong in the network box?
Summary and what’s next
Sources
- RHEL download page and the developer subscription FAQ.
- RHEL 10 documentation: the official guide to every Anaconda screen.
- VirtualBox, UTM, GNOME Boxes.
- The installer and its recipe: Anaconda documentation, Anaconda source code, kickstart syntax (pykickstart).
- Registration and repositories: Simple Content Access, Red Hat Insights.
- Virtual machine and clock: VirtualBox user manual, the chrony project.
- Alternative distributions: AlmaLinux, Rocky Linux.
- Screenshots: the installation and desktop screens are from the author’s RHEL 10.2 installation inside VirtualBox 7.2; VirtualBox 7 (Iketsi, CC BY-SA 4.0) and GNOME Boxes 47 (GNOME, LGPL) from Wikimedia Commons.


Related posts
Frequently asked questions
How do I download RHEL for free?
When you create a free Red Hat account at developers.redhat.com, the "Red Hat Developer Subscription for Individuals" is added to your account automatically; it lets you install and update RHEL on up to 16 systems at no cost and renews once a year when you re-accept the terms. From the same site's RHEL download page you download the ISO file for your processor (x86_64 for Intel/AMD, aarch64 for Apple Silicon Macs). There are two options: the 1 GB Boot ISO downloads the packages from Red Hat during installation and asks you to register your account in the installer; the roughly 10 GB DVD ISO contains everything and registration can wait. This series used the Boot ISO.
What is a virtual machine, and why not install RHEL directly on the computer?
A virtual machine is a second computer that a program (a hypervisor such as VirtualBox, UTM or GNOME Boxes) creates inside your computer: it has its own disk, memory, network card and operating system, but all of it runs in a window. It is the ideal environment for learning: it runs alongside Windows or macOS, if you break something you roll back to a snapshot, and deleting and reinstalling takes minutes. On real servers RHEL is installed directly on the hardware or on cloud virtual machines; the commands and the installation screens are the same.
Should I use VirtualBox, UTM or GNOME Boxes?
On Windows and Intel Macs, VirtualBox is free and sufficient. On Apple Silicon Macs (M1, M2, M3, M4) use UTM instead of VirtualBox and download RHEL's aarch64 ISO. If you use a Linux desktop, GNOME Boxes or virt-manager use the KVM virtualisation already in your system and are the fastest option. VMware Workstation is also free for personal use. The installation screens are identical in all of them; only the window for creating the virtual machine differs.
What are the minimum system requirements for installing RHEL?
For this series I recommend giving the virtual machine 2 processor cores, 4 GB of memory and 30 GB of disk; having at least 8 GB of memory in your computer itself keeps things comfortable. RHEL's official minimums are lower (1.5-2 GB of memory and 10 GB of disk for an installation without a desktop), but those limits get in the way when learning with a desktop environment. RHEL 10 also requires an Intel/AMD processor from 2013 or later (x86-64-v3); on an older computer, install RHEL 9.
Should I install RHEL 10 or RHEL 9?
In this series we use RHEL 10; it is the newest major release and will be supported until 2035. Choose RHEL 9 in two cases: if your computer's processor is older than 2013 (RHEL 10 requires x86-64-v3), or if RHEL 9 is used at your workplace and you want exactly the same environment. Almost all of the commands and screens in the series are the same on both releases; where they differ, I point it out.
Which software selection should I choose during installation?
For this series choose "Server with GUI": it comes with a desktop environment (GNOME), you open the terminal as a window and can look at documentation in a browser. On real servers, "Server" or "Minimal Install" is used; there is no desktop and everything is managed remotely through the terminal. As the series progresses you too will look at the desktop less and less; once you learn remote access in part 10 you can also set up a second machine without a desktop.
Should I enable the root account, or is a sudo-capable user enough?
In the RHEL 10 installer the root account comes disabled by default (Disable root account) and the first user you create is given administrator rights (the wheel group) with the box already ticked; this arrangement is sufficient and recommended. You do your daily work as your own user and put sudo in front of commands that need administrator rights. If you want to enable root, choose Enable root account during installation and set a password, but leave the Allow root SSH login with password box empty; to enable it later, sudo passwd root is enough. On RHEL 9 this box is called Root Password and root comes enabled.
What does subscription-manager register do, and is it mandatory?
It registers the machine you installed with your Red Hat account. Without registration the system runs, but Red Hat's package repositories are closed: you can neither get updates nor install new programs. When installing from the Boot ISO, this registration already happens in the installer's Connect to Red Hat box; then in the terminal you only check it with sudo subscription-manager status and see Overall Status: Registered in the output. If you installed from the DVD ISO without registering, sudo subscription-manager register asks for your username and password, links the machine to your account and opens the repositories; on RHEL 9 and 10 there is no separate subscription to attach.
What if I cannot download the ISO or create an account?
Download the ISO of AlmaLinux or Rocky Linux; both are free, require no account and use the same Anaconda installation screens as RHEL. The only difference is the registration step: instead of subscription-manager register, you go straight to dnf update without doing anything. Every command in the series works the same on both distributions; remember the family tree from part 1.
After installation dnf update said “Nothing to do”; is something wrong?
No. When installing from the Boot ISO, the packages are downloaded from Red Hat's repository in their current form at installation time; so a dnf update run right afterwards finds nothing to do and says Nothing to do. Had you installed from the DVD ISO, the hundreds of updates released since the ISO was made would be listed. The Updating Subscription Management repositories message on the first line of the command is normal too: dnf checks every time that the repository list is current.
What is the anaconda-ks.cfg file?
The recipe of the installation. When the installation finishes, Anaconda writes every choice you made on the installation screens (language, keyboard, network, host name, software environment, disk partitioning, users) into a text file called /root/anaconda-ks.cfg. This format is called kickstart. Give the same file to a new installation and Anaconda performs the same installation without asking a single question; that is how hundreds of servers are installed identically, and it forms the installation leg of Red Hat's automation tools (Satellite, Ansible).
Why did Anaconda create a separate /home partition?
By the rule of automatic partitioning: if the disk is larger than 50 GiB, Anaconda opens a separate /home logical volume for user files, so that they can be preserved even if you reinstall the system. On a 30 GB disk this partition is not created and everything stays in the root partition. On my machine, with an 87.7 GiB disk, the layout was: 1 MiB biosboot, 2 GiB /boot, and the rest inside LVM as a 54.3 GiB root, 4.8 GiB swap and 26.5 GiB /home, all with the XFS file system.
What are the first things to do after installation?
In order: register the machine with your Red Hat account (subscription-manager register), update the whole system (sudo dnf update -y) and reboot, then take a "clean install" snapshot of the virtual machine. After that you can experiment as much as you like and roll back to that snapshot if you break something. Optionally, enable the Cockpit web console and watch the machine from a browser as well.
Can I install RHEL on a real computer, or is a virtual machine required?
A virtual machine is not required; we use one in this series because it is safe, but you can install RHEL straight onto a real computer. The only difference is at the start: you write the ISO to a USB stick with Fedora Media Writer, balenaEtcher, Rufus or dd, then boot the computer from that USB via the BIOS/UEFI boot menu (F12 on most machines). The Anaconda screens are the same in both. Careful: a real disk holds your own data; Automatic partitioning uses the free space, but always back up before installing. If you want to keep it on the same disk as Windows you need dual boot, which is a more advanced topic.